Agent Config 페이지 : https://IP\_FQDN/agent\_config.php
[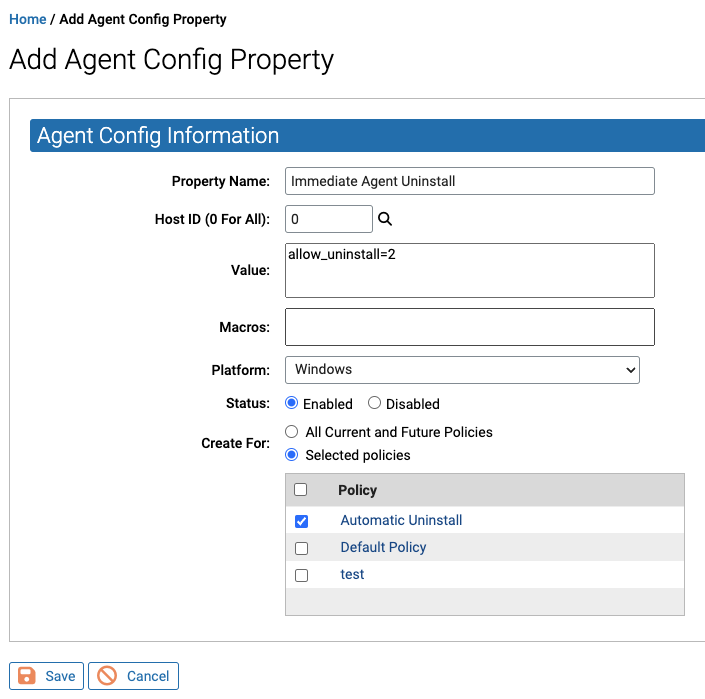](https://bs.etevers.tech/uploads/images/gallery/2024-01/vwkimage.png) \- 에이전트 자동 삭제 정책 설정 입력 - Property Name: 설정 이름 지정 - Host ID (0 For All): 엔드포인트 지정 ('0' 으로 입력 시 모든 엔드포인트 지정됨) - Value: 에이전트 삭제 허용 - Platform: OS 정보 선택 - Status: 활성화 여부 선택 - Create For : 적용할 정책 범위 선택 - Host ID '0' 입력 시 : 생성한 '자동 제거 정책' 선택 - 제거 정책이 할당된 에이전트 삭제 - Host ID '특정 호스트 ID' 입력 시 : 모든 정책 선택 - 특정 호스트 ID에 해당되는 에이전트 삭제 [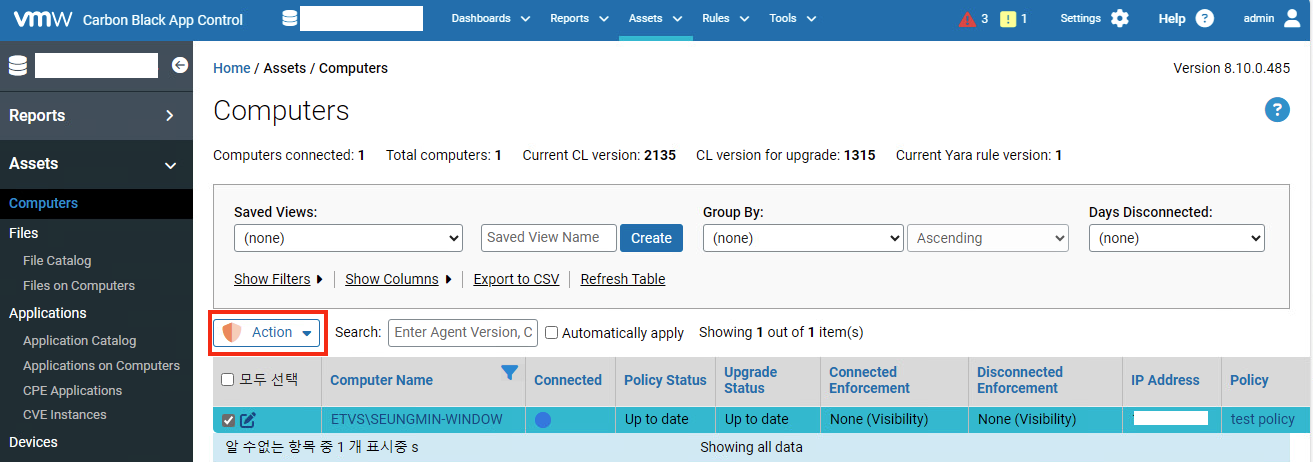](https://bs.etevers.tech/uploads/images/gallery/2024-01/yOuimage.png) \- \[App Control\] 웹 콘솔 접속 > \[Assets\] - \[Computers\] 메뉴 이동 > \[Action\] 버튼 클릭 [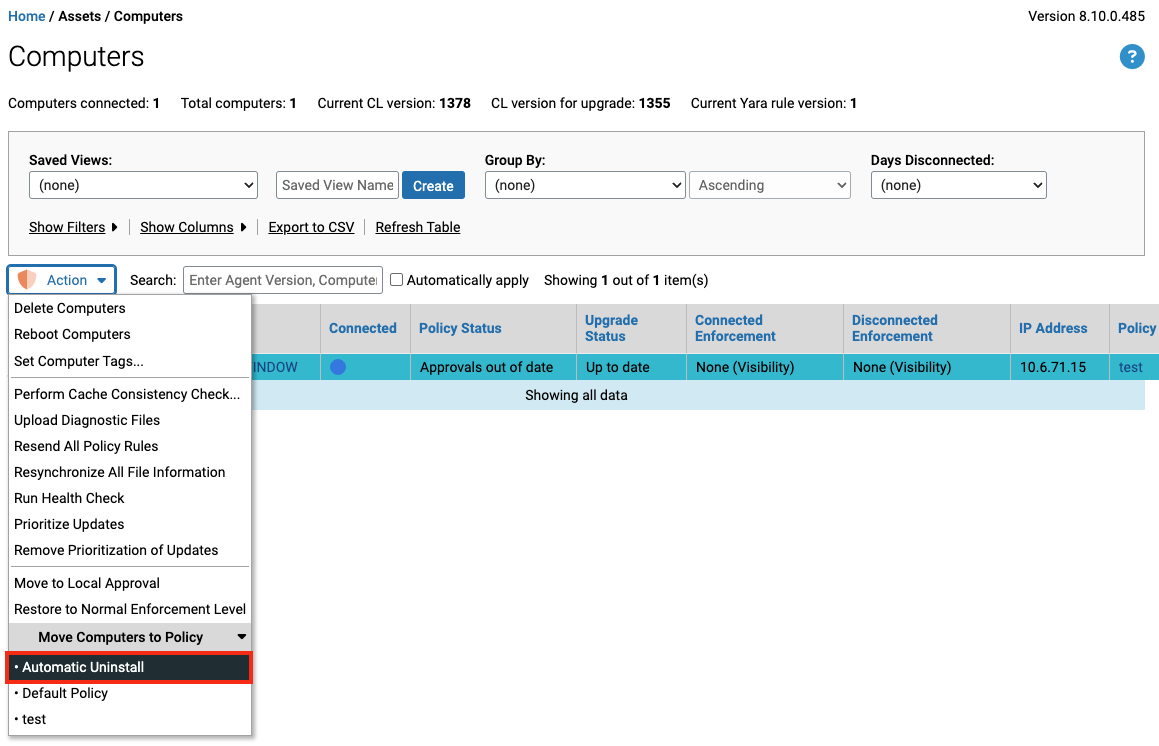](https://bs.etevers.tech/uploads/images/gallery/2024-01/t4Kimage.png) \- 엔드포인트 선택 및 '자동 삭제 정책'을 적용하여 설치된 에이전트 삭제 진행 [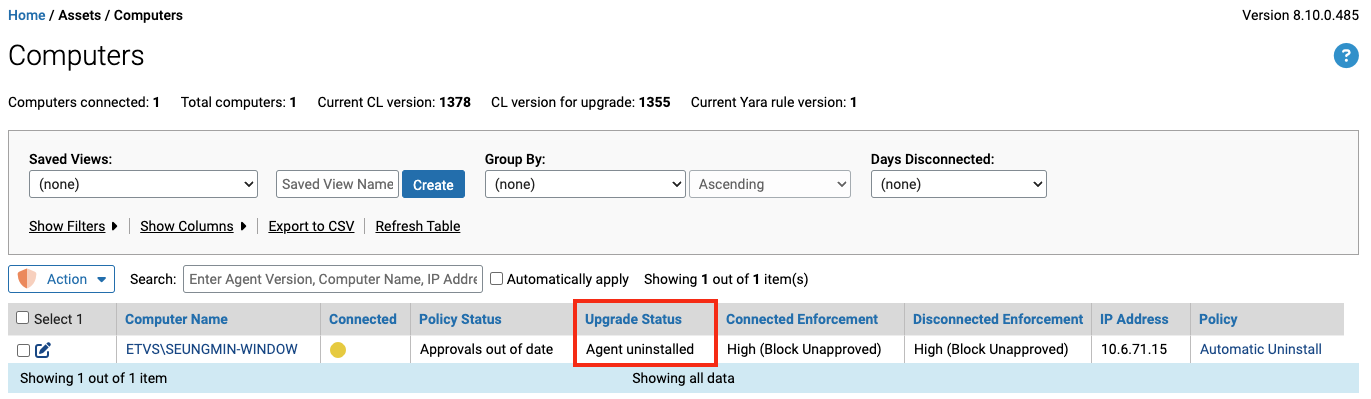](https://bs.etevers.tech/uploads/images/gallery/2024-01/XiOimage.png) \- \[App Control\] 웹 콘솔 접속 > \[Assets\] - \[Computers\] 의 자산 상태 정보 확인 #### 1.2 수동 삭제 ##### 1.2.1 GUI 삭제 [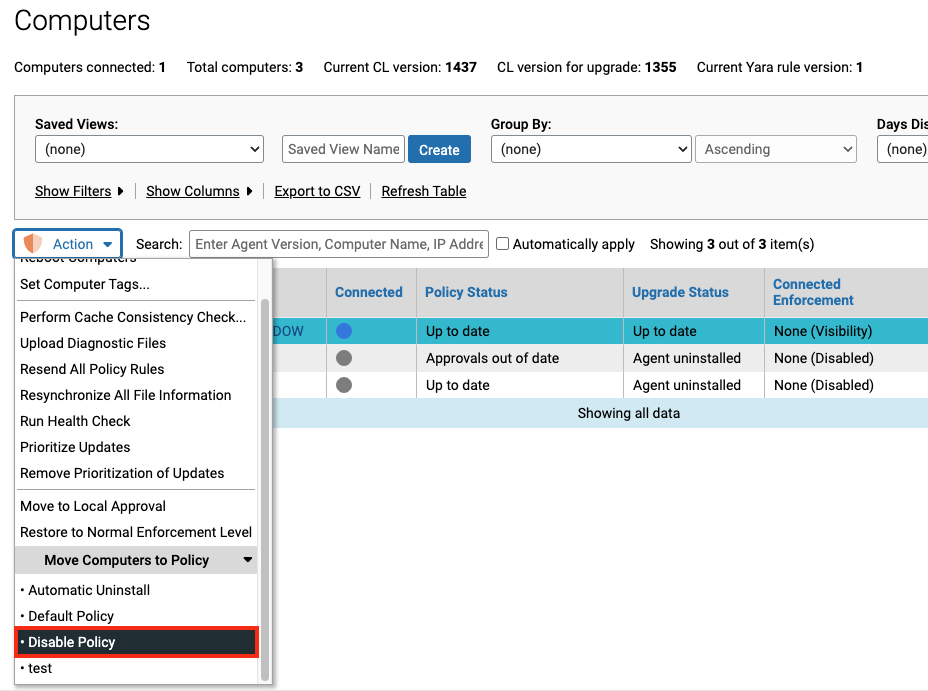](https://bs.etevers.tech/uploads/images/gallery/2024-01/LhZimage.png) \- \[App Control\] 웹 콘솔 접속 > \[Assets\] - \[Computer\] 메뉴 접속 > 삭제할 컴퓨터 선택 후 \[Action\] 버튼 클릭 > 생성한 'Disable Policy' 선택 [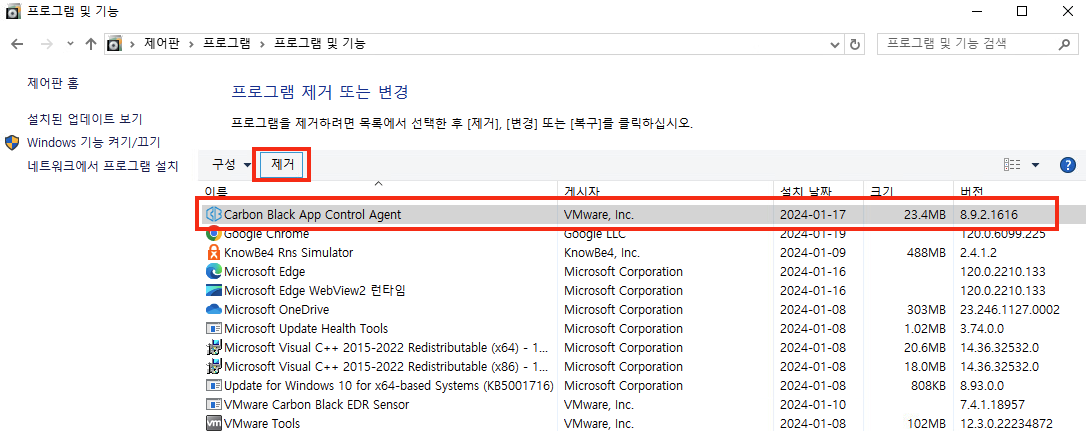](https://bs.etevers.tech/uploads/images/gallery/2024-01/D7Aimage.png) \- App Control 에이전트' 설치된 사용자 데스크탑 접속 > \[제어판\] - \[프로그램 및 기능\] 실행 > \[App Control Agent\] 선택 후 '제거' 버튼 클릭 [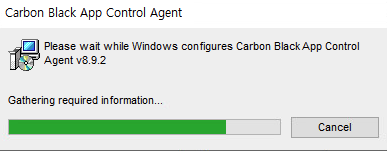](https://bs.etevers.tech/uploads/images/gallery/2024-01/4K4image.png) \- 삭제 진행 [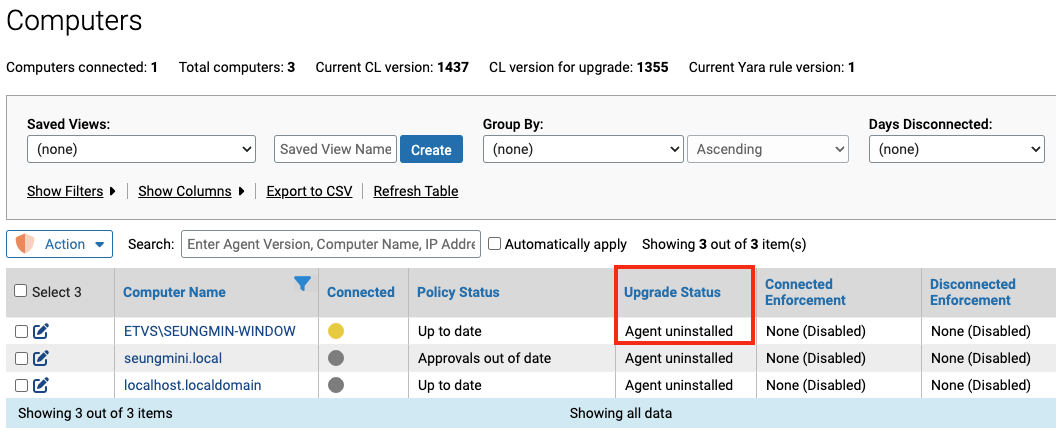](https://bs.etevers.tech/uploads/images/gallery/2024-01/BeVimage.png) \- \[App Control\] 웹 콘솔 접속 > \[Assets\] - \[Computers\] 의 자산 상태 정보 확인 ##### 1.2.2 CLI 삭제 참고 문서 : [https://community.carbonblack.com/t5/Knowledge-Base/App-Control-How-to-Manually-Uninstall-an-Agent-Windows/ta-p/62044](https://community.carbonblack.com/t5/Knowledge-Base/App-Control-How-to-Manually-Uninstall-an-Agent-Windows/ta-p/62044) [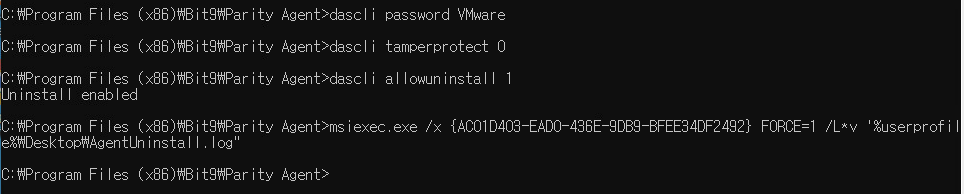](https://bs.etevers.tech/uploads/images/gallery/2024-01/E1timage.png) \- 'App Control 에이전트' 설치된 사용자 데스크탑 접속 > \[CMD\] 관리자 권한으로 실행 > 삭제 명령어 입력 ``` # 설치 경로 이동 cd "C:\Program Files (x86)\Bit9\Parity Agent" # 삭제 허용 작업 dascli password (설치 시 입력한 에이전트 비밀번호) dascli tamperprotect 0 dascli allowuninstall 1 # 삭제 명령 진행 (GUID 의 경우 에이전트 버전에 맞는 GUID 입력 필요) msiexec.exe /x {GUID} FORCE=1 /L*v "%userprofile%\Desktop\AgentUninstall.log" ```에이전트 GUID 확인 링크 : https://community.carbonblack.com/t5/Knowledge-Base/App-Control-Agent-Versions-Product-GUID/ta-p/64830
[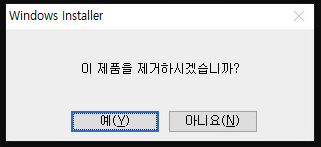 ](https://bs.etevers.tech/uploads/images/gallery/2024-01/b4oimage.png)[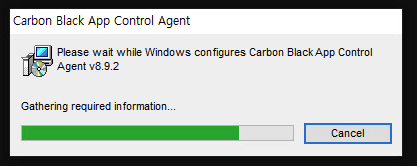](https://bs.etevers.tech/uploads/images/gallery/2024-01/SLWimage.png) \- 삭제 진행 [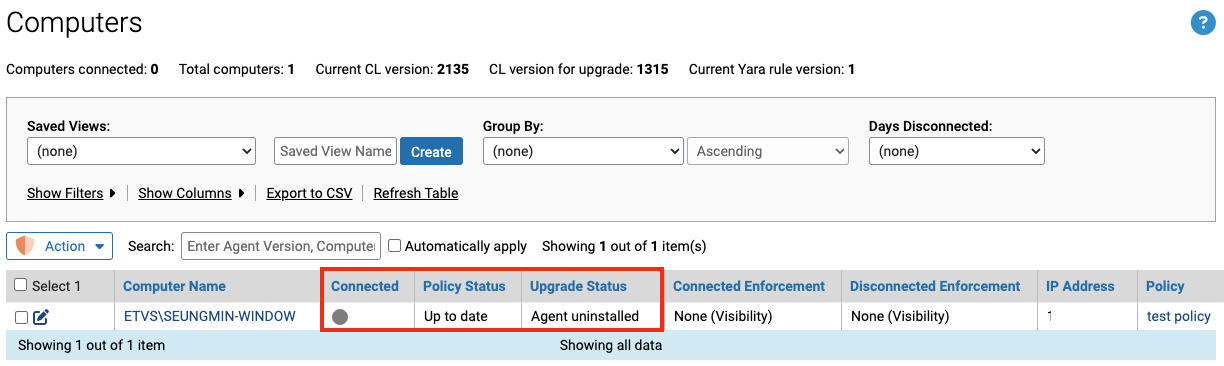](https://bs.etevers.tech/uploads/images/gallery/2024-01/VCBimage.png) \- \[App Control\] 웹 콘솔 접속 > \[Assets\] - \[Computers\] 의 자산 상태 정보 확인 ### 2. MAC 에이전트 삭제 #### 2.1 수동 삭제 [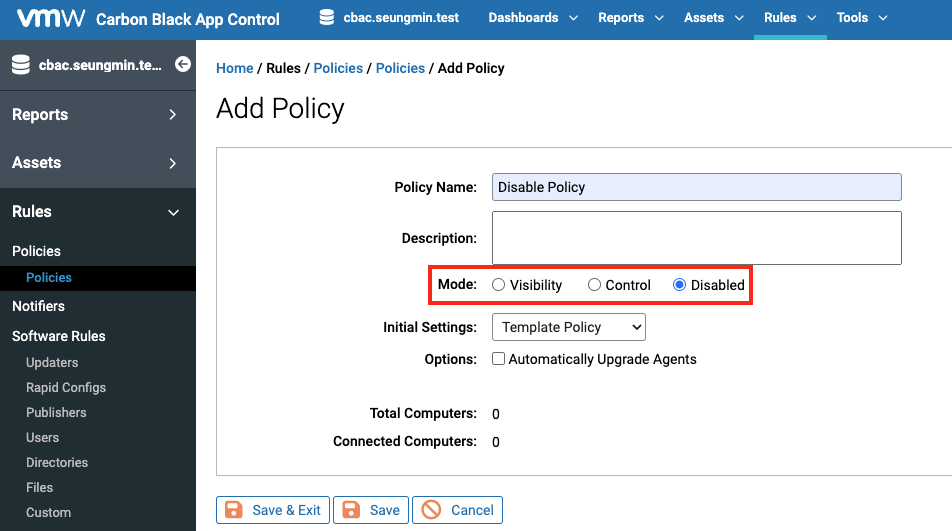](https://bs.etevers.tech/uploads/images/gallery/2024-01/vsUimage.png) \- Disabled 모드 선택하여 새로운 정책 생성 [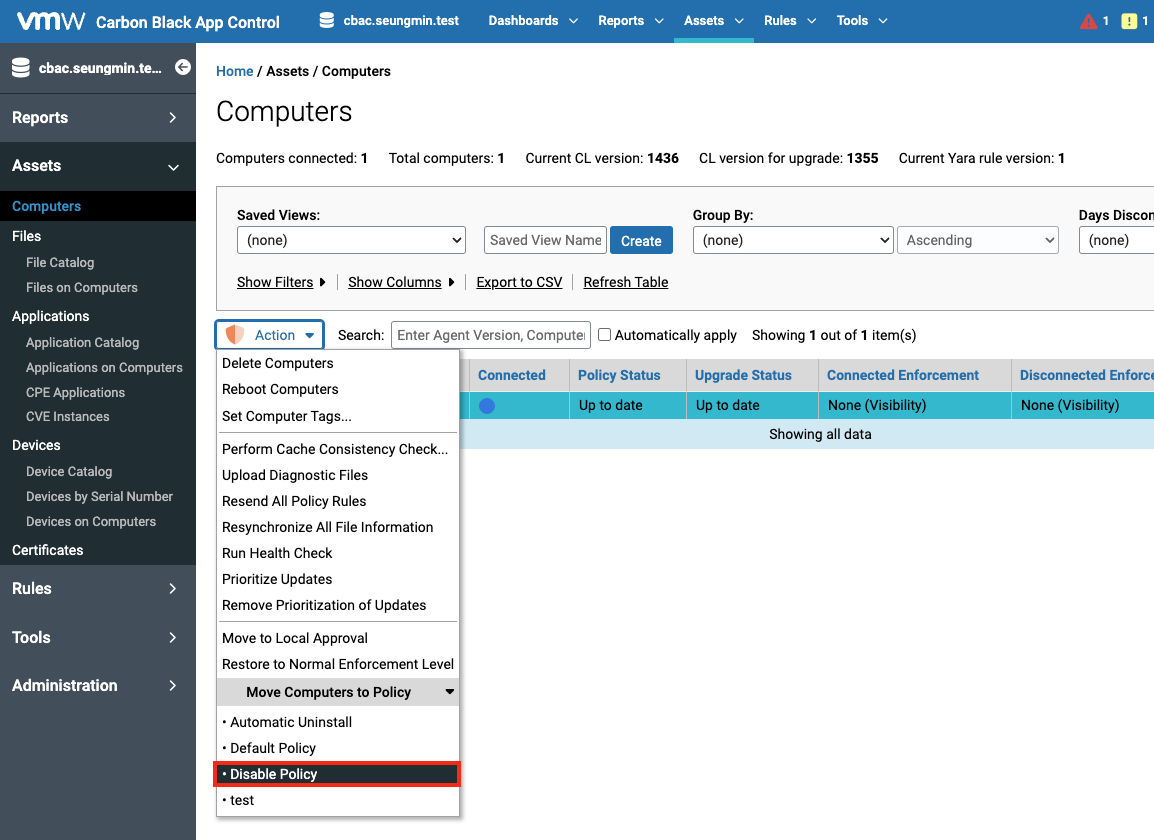](https://bs.etevers.tech/uploads/images/gallery/2024-01/JmKimage.png) \- 생성한 Disable 정책을 삭제할 엔드포인트에 정책 적용 [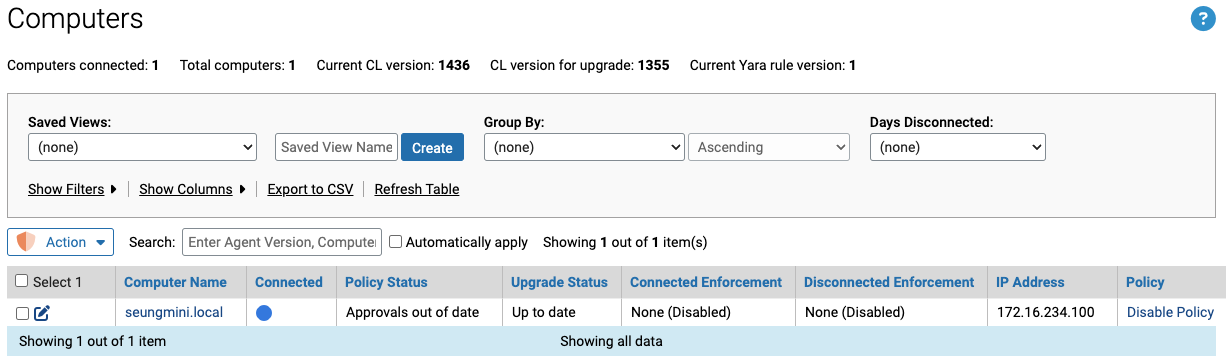](https://bs.etevers.tech/uploads/images/gallery/2024-01/mWQimage.png) \- 엔드포인트에 Disabled 정책 적용됨을 확인 [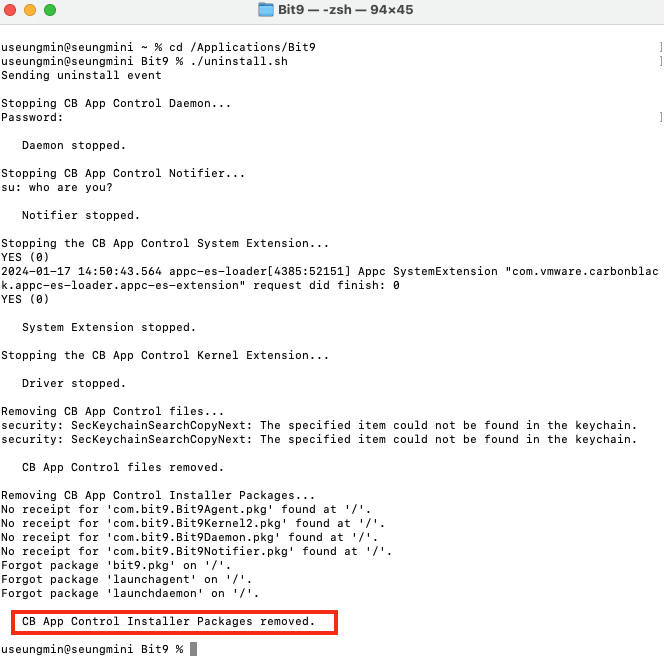](https://bs.etevers.tech/uploads/images/gallery/2024-01/PbNimage.png) \- 'App Control 에이전트' 설치된 사용자 데스크탑 접속 > \[터미널\] 실행 > 삭제 명령어 입력 [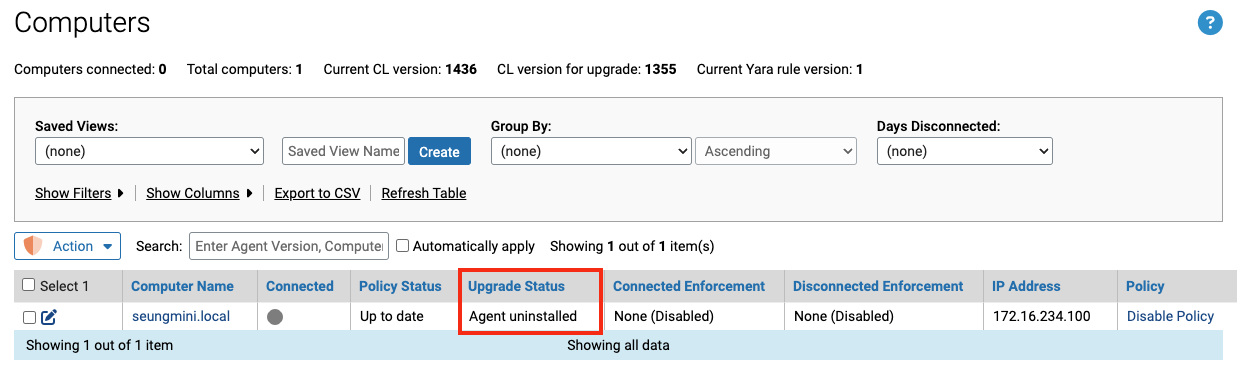](https://bs.etevers.tech/uploads/images/gallery/2024-01/nLiimage.png) \- 에이전트 삭제 확인 ### 3. Linux 에이전트 삭제 #### 3.1 수동 삭제해당 작업은 관리자 권한으로 실행합니다.
[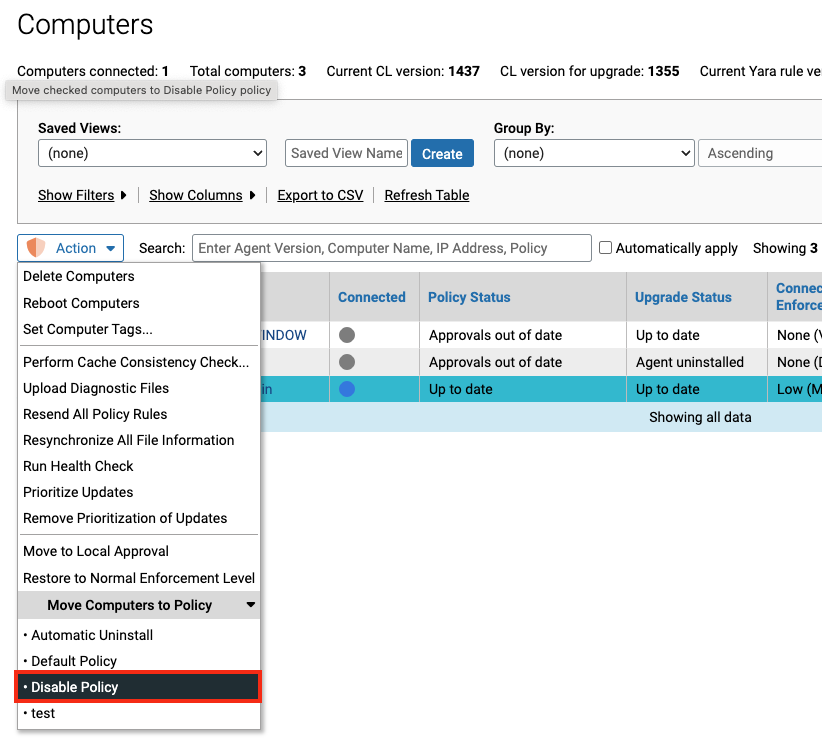](https://bs.etevers.tech/uploads/images/gallery/2024-01/P8iimage.png) \- 이전에 생성한 에이전트 비활성화 정책 적용 [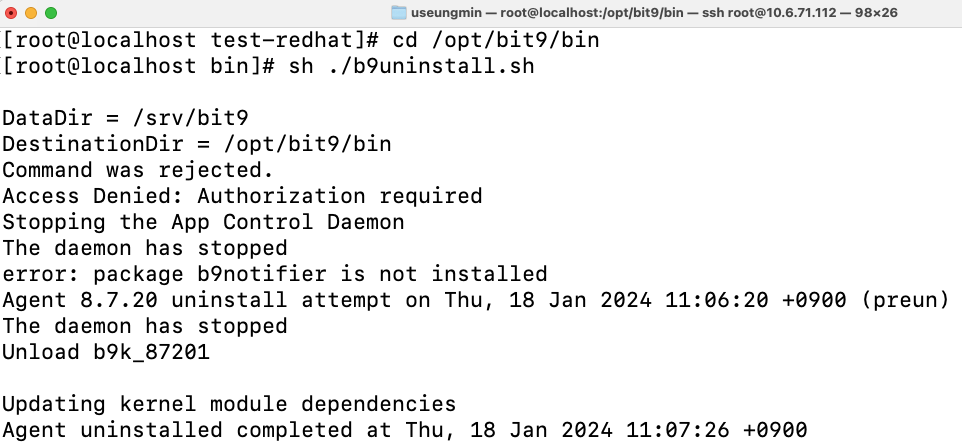](https://bs.etevers.tech/uploads/images/gallery/2024-01/3nMimage.png) \- 삭제 스크립트 실행하여 에이전트 삭제 - 전체 삭제의 경우 (에이전트 및 데이터 삭제) : sh ./b9uninstall.sh - 일부 삭제의 경우 (에이전트 삭제 및 데이터 보존) : sh ./b9uninstall.sh -d [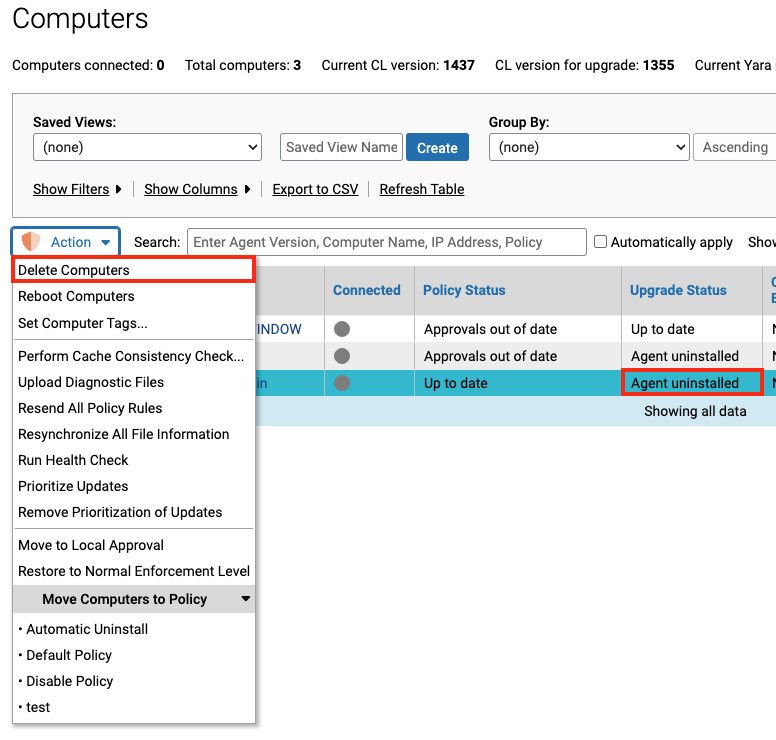](https://bs.etevers.tech/uploads/images/gallery/2024-01/tK5image.png) \- 에이전트 삭제 확인 및 'Delete Computers' 선택하여 에이전트 목록 삭제 # 삭제: 서버 삭제 ## 개요 App Control 서버 삭제 방법입니다. ## 진행 방법 ### 1. Server 삭제에이전트 삭제 작업 필요 : 서버 먼저 삭제 할 경우, 모든 정책 비활성화 작업 진행
[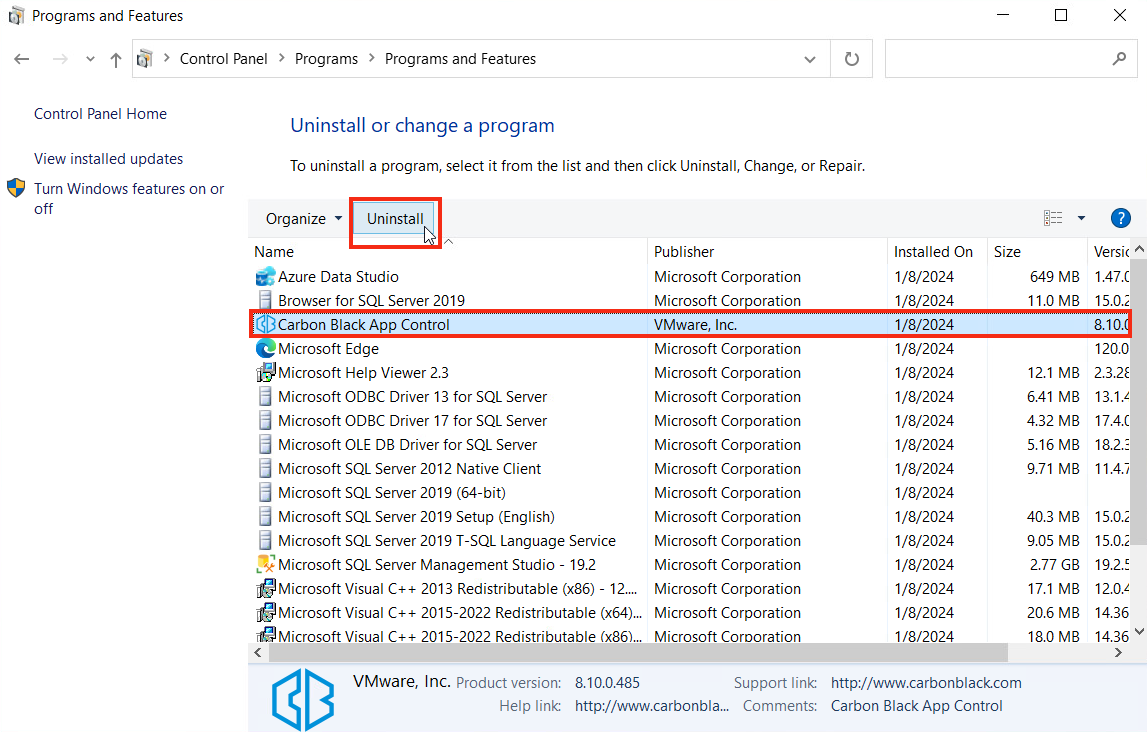](https://bs.etevers.tech/uploads/images/gallery/2024-01/7R8image.png) \- \[App Control\] 설치 서버 접속 > \[제어판\] - \[프로그램 제거\] 실행 > 'Carbon Black App Control' 선택 후 \[Uninstall\] 버튼 클릭 [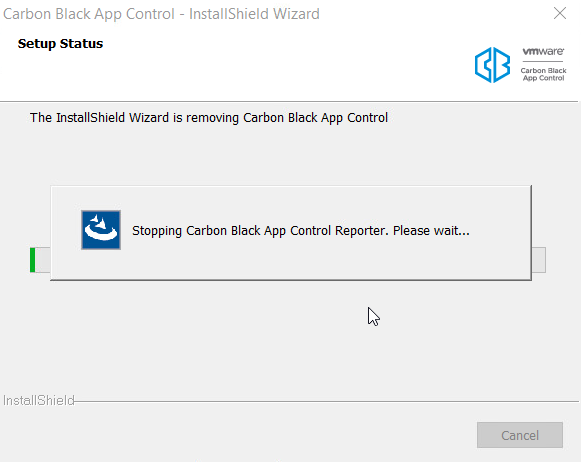](https://bs.etevers.tech/uploads/images/gallery/2024-01/Cjvimage.png) \- App Control 삭제 프로그램 실행되며, 실행 중인 App Control 서비스 중지 후 서버 삭제 진행 및 완료 [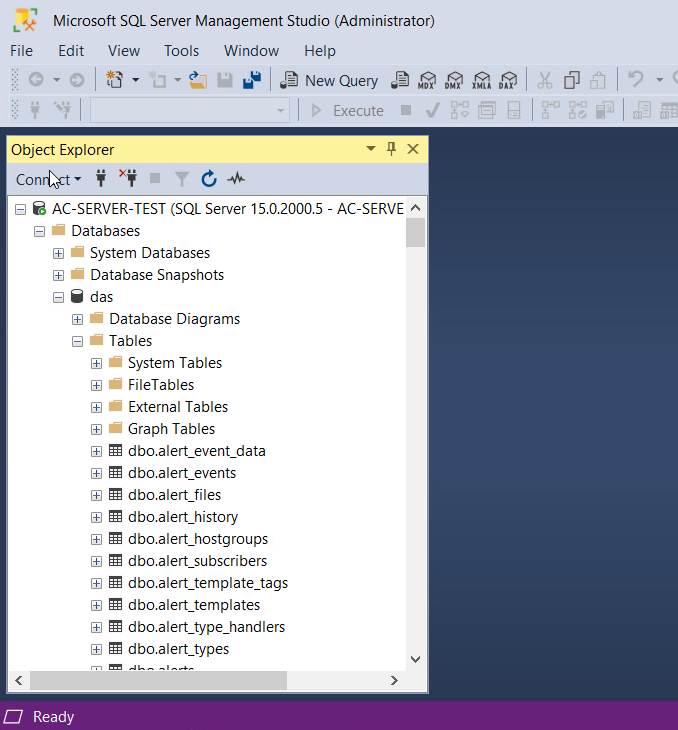](https://bs.etevers.tech/uploads/images/gallery/2024-01/h4Fimage.png) \- 생성된 데이터베이스는 제거되지 않으므로, 별도 삭제 작업 필요 - App Control 은 'das' 라는 단일 SQL 데이터베이스 사용함