# 지원 요청 (Support Reqest)

## 개요

 고객 및 파트너가 기술지원/비기술지원을 생성하는 방법에 대해 서술한 가이드이다.

### 대상 

<table border="1" id="bkmrk-%EB%8C%80%EC%83%81-%EC%83%81%ED%83%9C-%EB%B9%84%EA%B3%A0-%EC%84%B8%EC%9D%BC%EC%A6%88-%EA%B2%80%EC%88%98-%EC%97%94%EC%A7%80%EB%8B%88%EC%96%B4" style="border-collapse: collapse; width: 100%;"><colgroup><col style="width: 33.3731%;"></col><col style="width: 33.3731%;"></col><col style="width: 33.3731%;"></col></colgroup><thead><tr><td class="align-center">**상태**</td><td class="align-center">**대상**</td><td class="align-center">**단계**</td></tr></thead><tbody><tr><td><p class="callout success">검수</p>

</td><td class="align-center">세일즈/엔지니어링

</td><td class="align-center">프리세일즈

</td></tr></tbody></table>

## 기술/비기술 지원 요청 방법

<p class="callout info">Omnissa Customer Connect URL: [https://customerconnect.omnissa.com/](https://customerconnect.omnissa.com/ "https://customerconnect.omnissa.com/")</p>

<table border="1" id="bkmrk-%28%EA%B7%B8%EB%A6%BC%29-%EC%84%A4%EB%AA%85-%28%EA%B7%B8%EB%A6%BC%29-%EC%84%A4%EB%AA%85" style="border-collapse: collapse; width: 100%; height: 1000.89px;"><colgroup><col style="width: 50.0596%;"></col><col style="width: 50.0596%;"></col></colgroup><tbody><tr style="height: 204.525px;"><td style="height: 204.525px;">![image.png](https://bs.etevers.tech/uploads/images/gallery/2025-10/scaled-1680-/wIBimage.png)

</td><td style="height: 204.525px;">- Omnissa Customer Connect Partal 접속
- 로그인 진행

</td></tr><tr style="height: 195.65px;"><td style="height: 195.65px;">![image.png](https://bs.etevers.tech/uploads/images/gallery/2025-10/scaled-1680-/zVKimage.png)

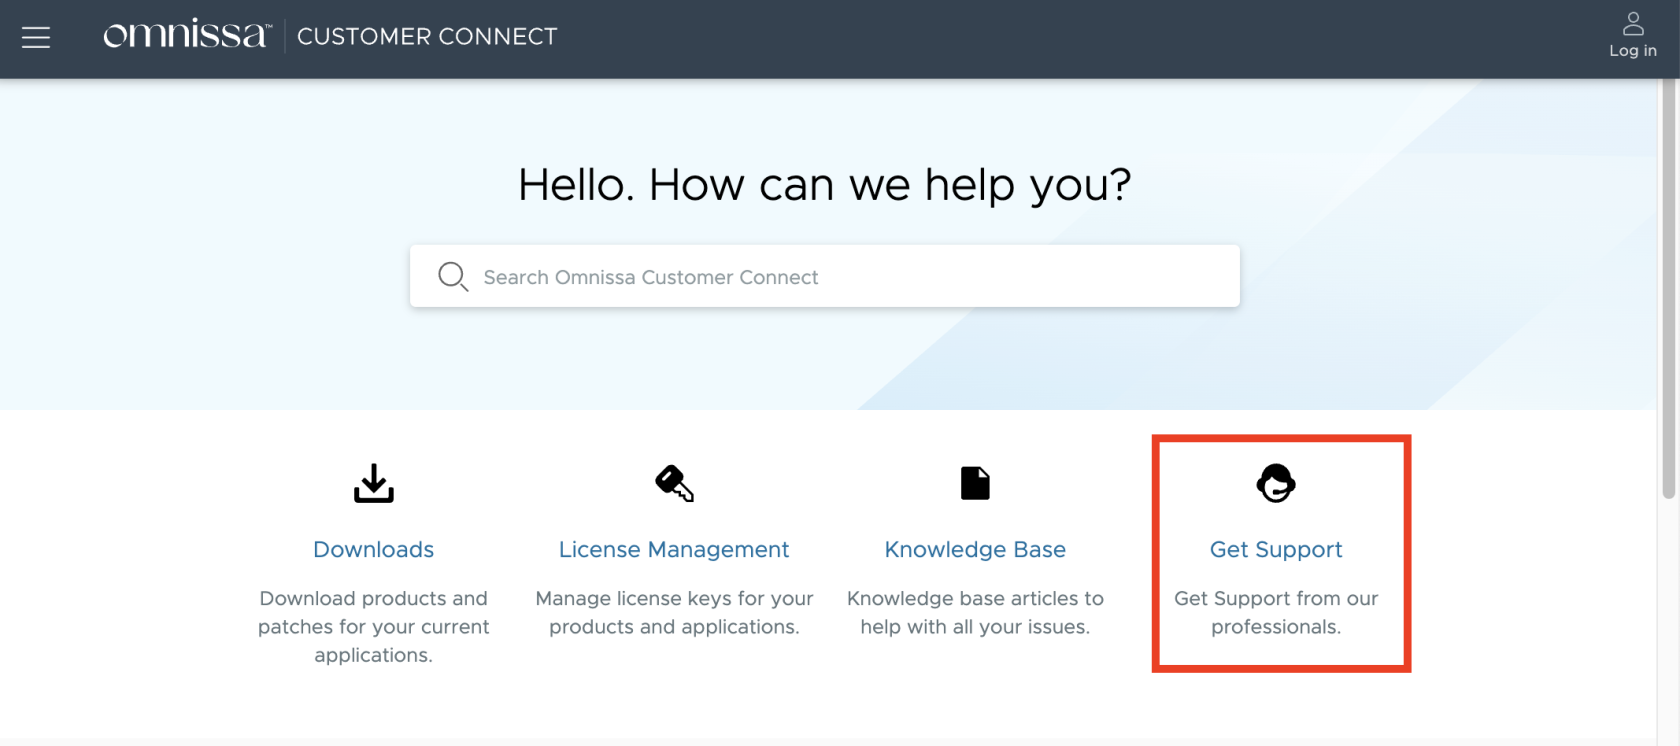
</td><td style="height: 195.65px;">- 메인 화면의 \[Get Support\] 메뉴 선택

</td></tr><tr style="height: 256.8px;"><td style="height: 256.8px;">![image.png](https://bs.etevers.tech/uploads/images/gallery/2025-10/scaled-1680-/5Wuimage.png)

</td><td style="height: 256.8px;">- 비기술 지원 방법 : 라이선스, 포탈, 계정 관리 관련 이슈
    
    
    - Non-Technical Support 의 \[Request Support\] 버튼 선택
- 기술 지원 방법 : 제품에 대한 기술 관련 이슈
    
    
    - Technical Support 의 \[Request Support\] 버튼 선택

</td></tr><tr style="height: 255.113px;"><td style="height: 255.113px;">![image.png](https://bs.etevers.tech/uploads/images/gallery/2025-10/scaled-1680-/m9Timage.png)

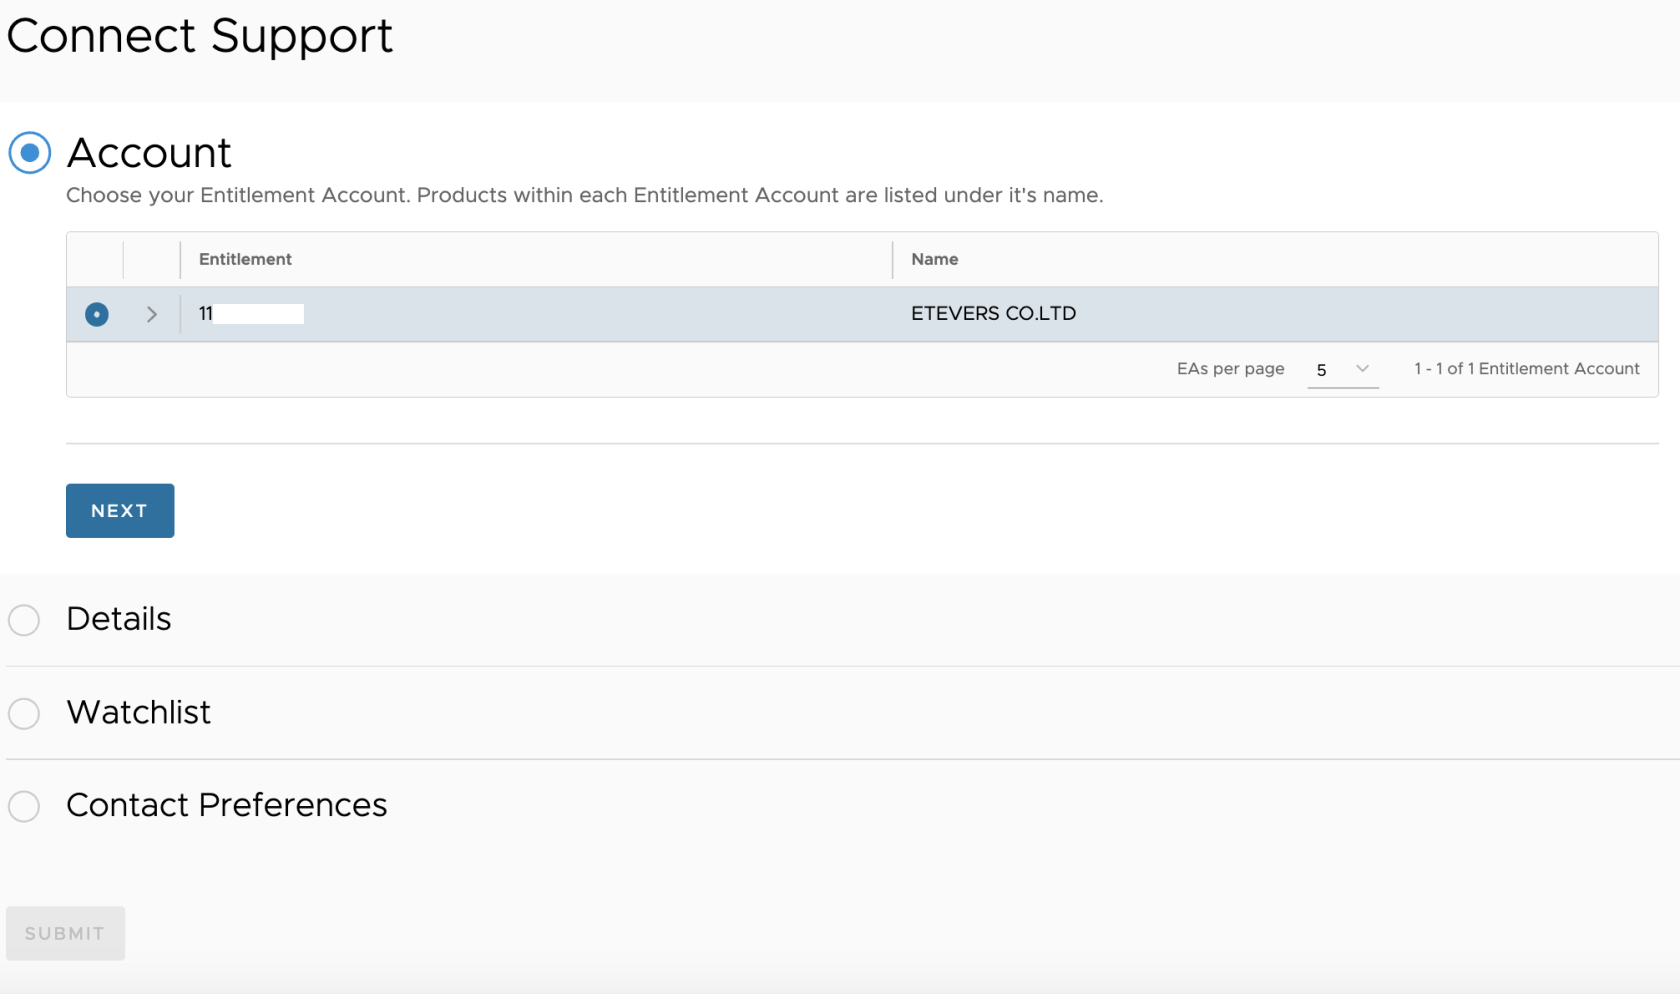
</td><td style="height: 255.113px;">- Account 의 'Entitlement' 선택하고 \[NEXT\] 선택

</td></tr><tr style="height: 29.6px;"><td style="height: 29.6px;">![image.png](https://bs.etevers.tech/uploads/images/gallery/2025-10/scaled-1680-/hz7image.png)

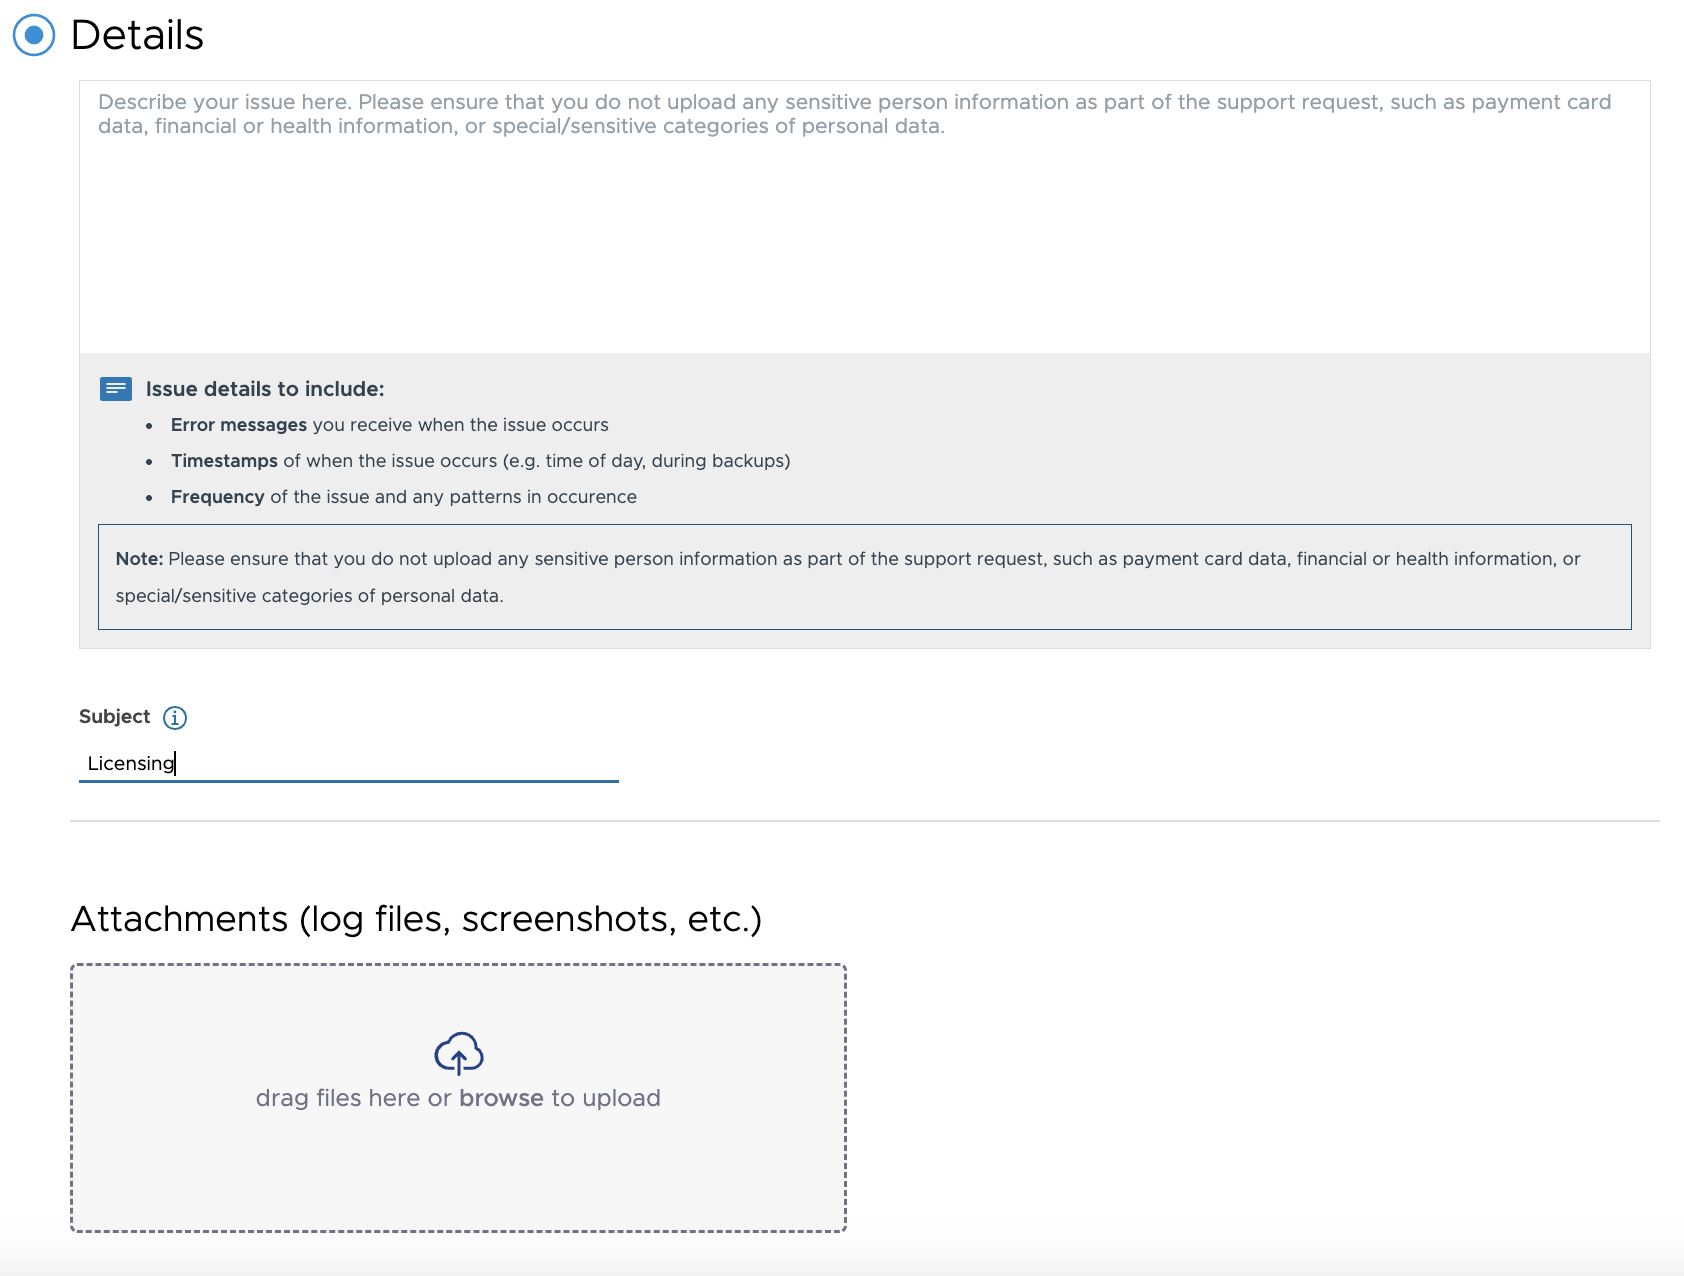
</td><td style="height: 29.6px;">- 현재 발생하고 있는 문제에 대한 상세 정보 입력
    
    
    - 로그 파일 또는 스트린샷 첨부
- 작성 완료 후 \[NEXT\] 선택하여 다음 단계로 이동

</td></tr><tr style="height: 29.6px;"><td style="height: 29.6px;">![image.png](https://bs.etevers.tech/uploads/images/gallery/2025-10/scaled-1680-/paJimage.png)

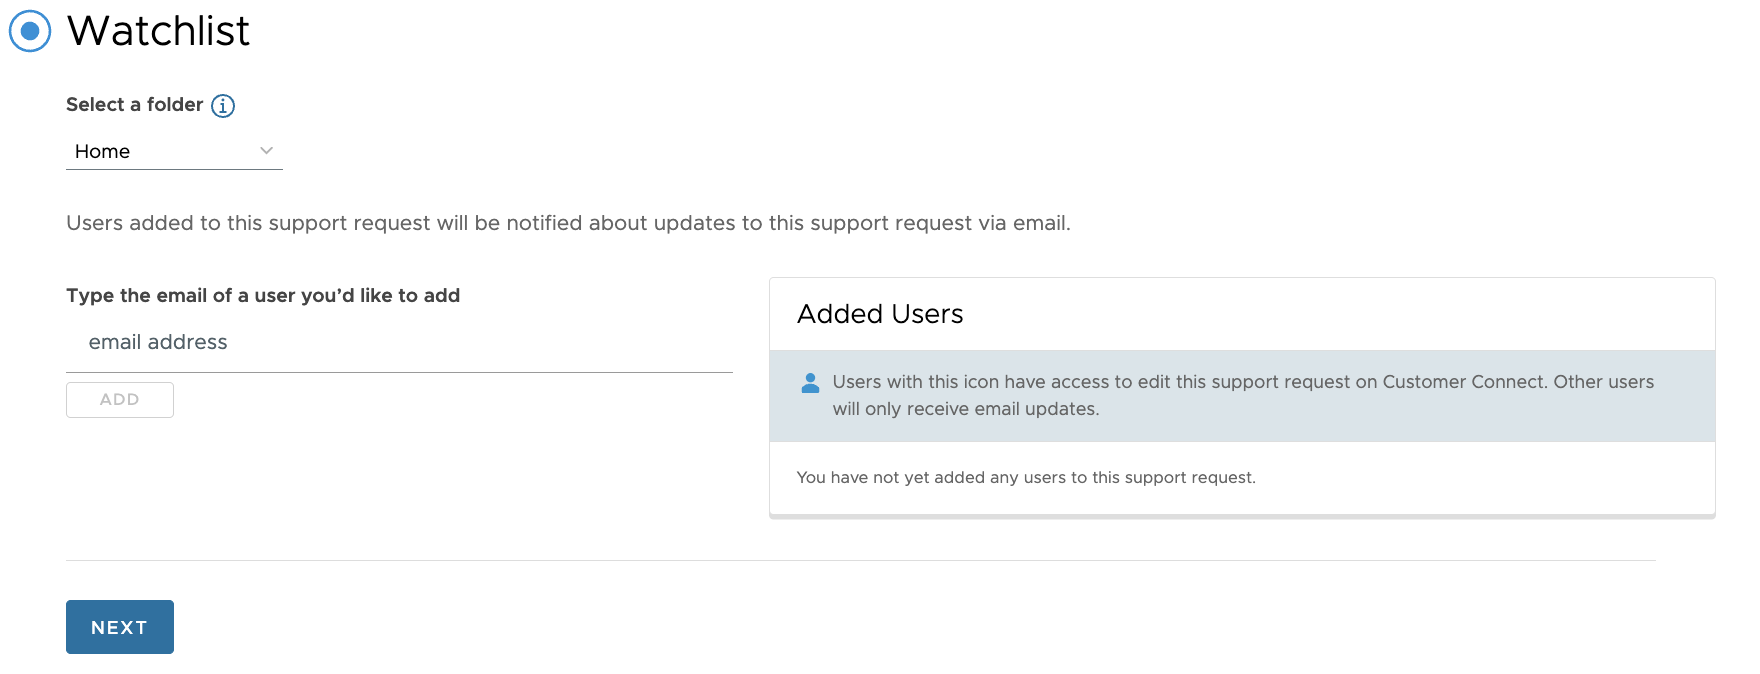
</td><td style="height: 29.6px;">- Select a folder : 생성된 케이스를 편집할 수 있는 사용자 추가
- Type the email of a user you’d like to add :   
    케이스 진행 사항에 대해 추가적으로 이메일 받을 수 있도록 사용자 CC 추가
- 작성 완료 후 \[NEXT\] 선택하여 다음 단계로 이동

</td></tr><tr style="height: 29.6px;"><td style="height: 29.6px;">![image.png](https://bs.etevers.tech/uploads/images/gallery/2025-10/scaled-1680-/A1kimage.png)

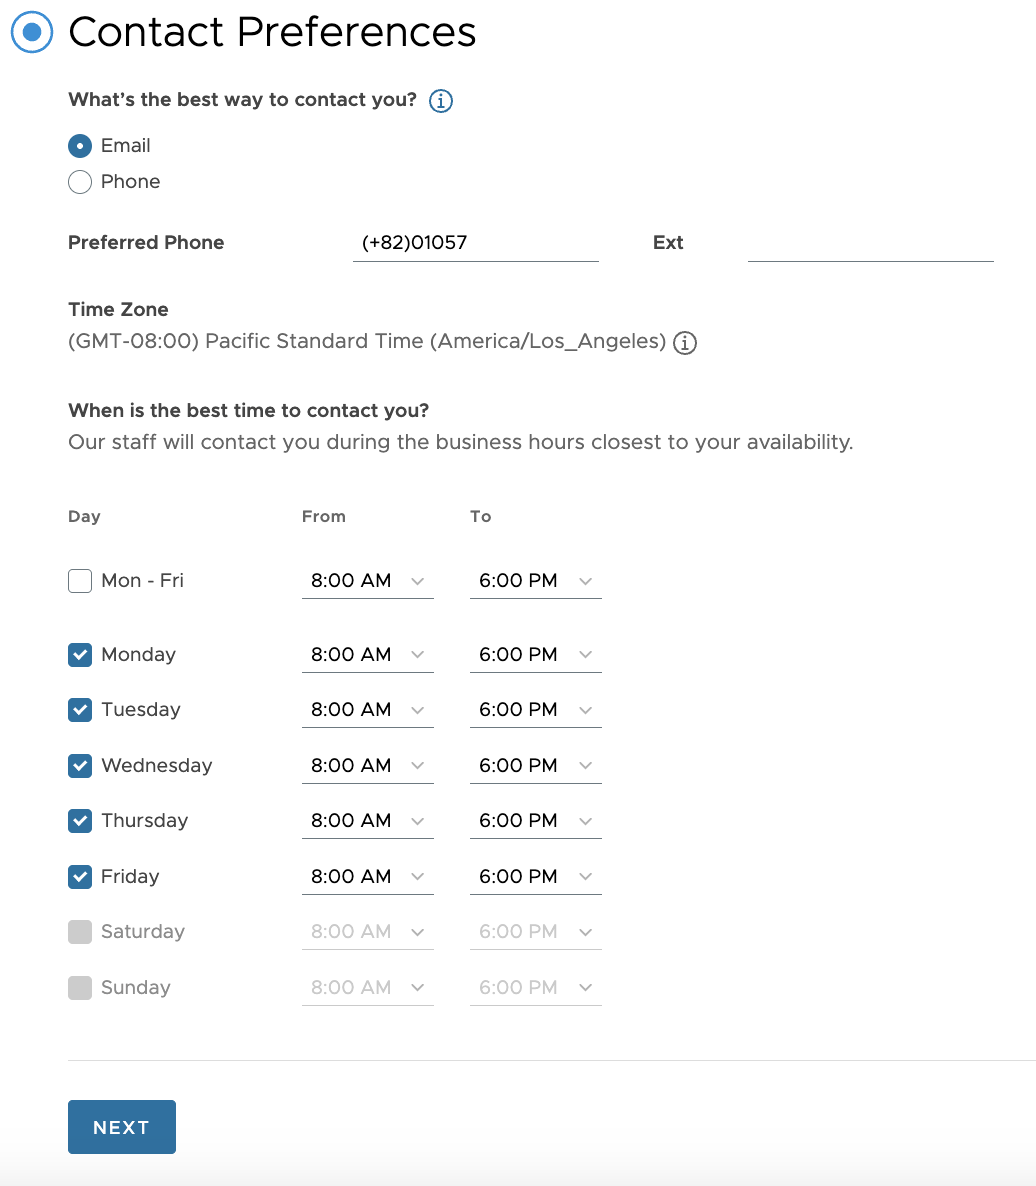
</td><td style="height: 29.6px;">- 케이스 진행 시에 Omnissa 담당자와 컨택할 수 있는 방법 선택
- 작성 완료 후 \[NEXT\] 선택하여 다음 단계로 이동

</td></tr><tr><td>![image.png](https://bs.etevers.tech/uploads/images/gallery/2025-10/scaled-1680-/rx4image.png)

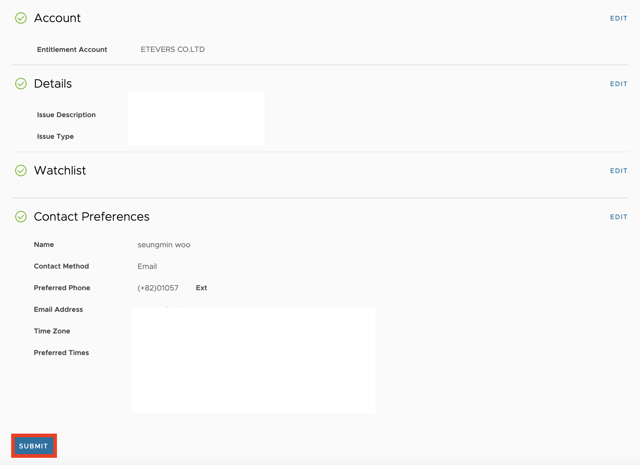
</td><td>- 신청한 내역 확인
- \[Submit\] 하여 케이스 생성 완료

</td></tr></tbody></table>

##