메이저 업그레이드의 경우, 제품의 버전이 변경됩니다. 해당 경우에는 사용자가 환경 업그레이드와 함께 Customer Connect 포털에서 라이선스 키를 업그레이드하여 사용해야 합니다. 예) vSphere 6.0 >> vSphere 7.0
마이너 업그레이드의 경우, 버그 수정 등 작은 개선을 위한 업그레이드이며 제품의 버전이 변경되지 않습니다. 사용자는 환경 업그레이드만 하며 라이선스 키는 변경하여 적용할 필요가 없습니다. 예) vSphere 6.5 >> vSphere 6.7
[](https://bs.etevers.tech/uploads/images/gallery/2022-12/bjyimage.png) 1\. 라이선스 관리 페이지에서 \[Upgradable\]을 선택한 후 목록에서 라이선스 업그레이드할 제품을 선택합니다. [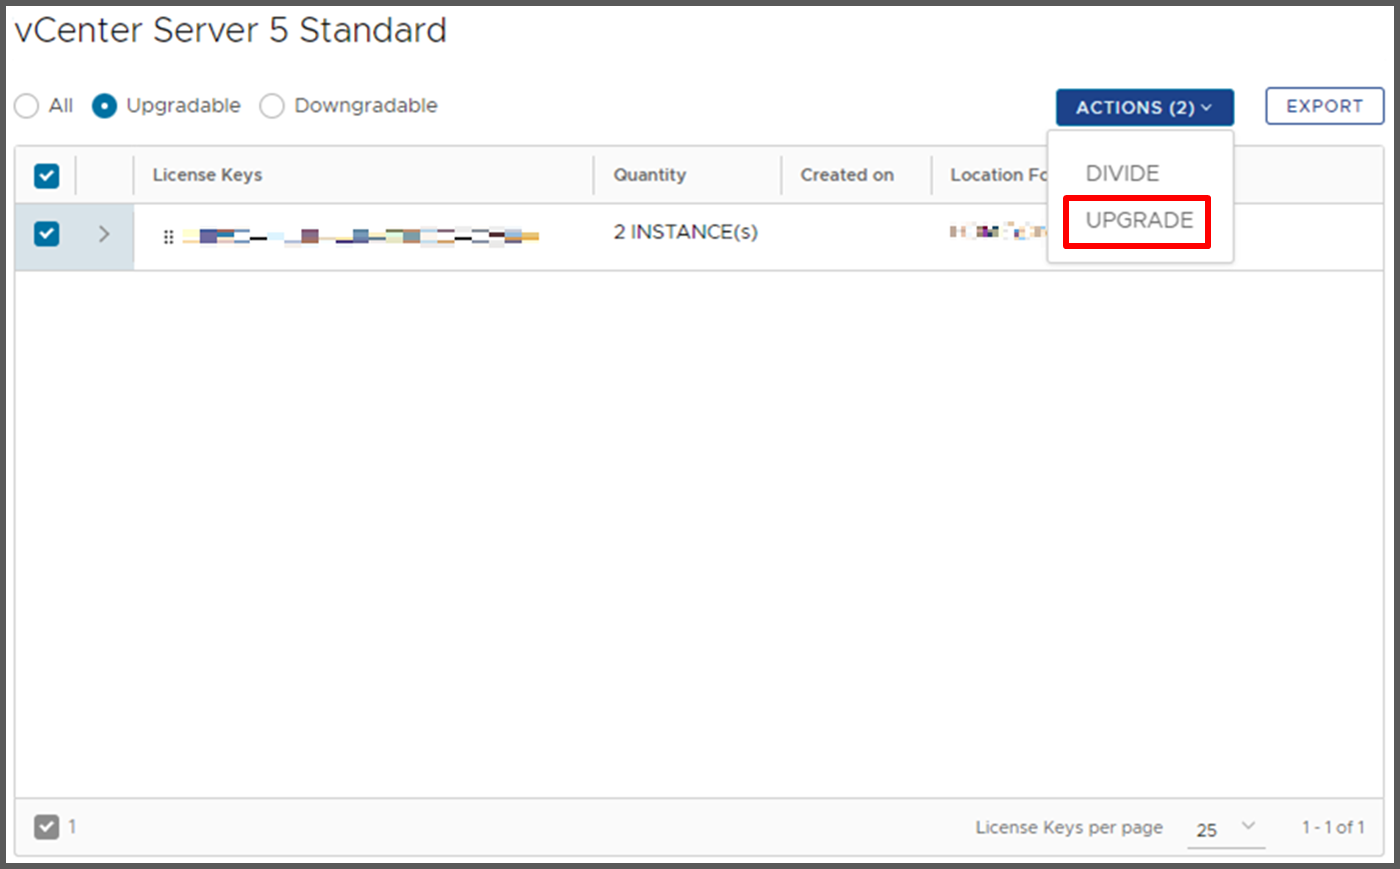](https://bs.etevers.tech/uploads/images/gallery/2022-12/uDrimage.png) 2\. 업그레이드할 라이선스 키를 체크한 후 \[UPGRADE\]를 클릭합니다. [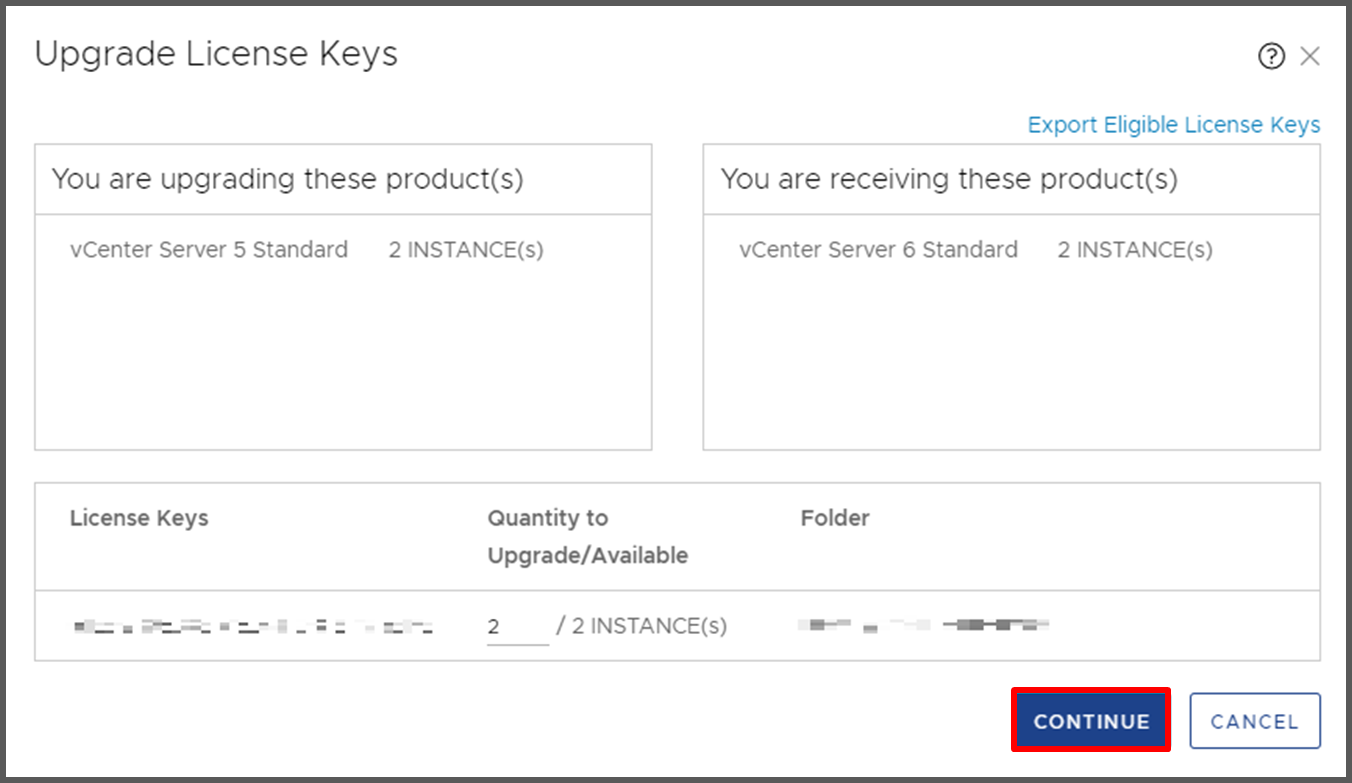](https://bs.etevers.tech/uploads/images/gallery/2022-12/JB5image.png) 3\. 해당 창이 나타나면 원하는 수량을 입력한 후 \[CONTINUE\]를 클릭하면 라이선스 업그레이드가 완료됩니다. ### 다운그레이드 [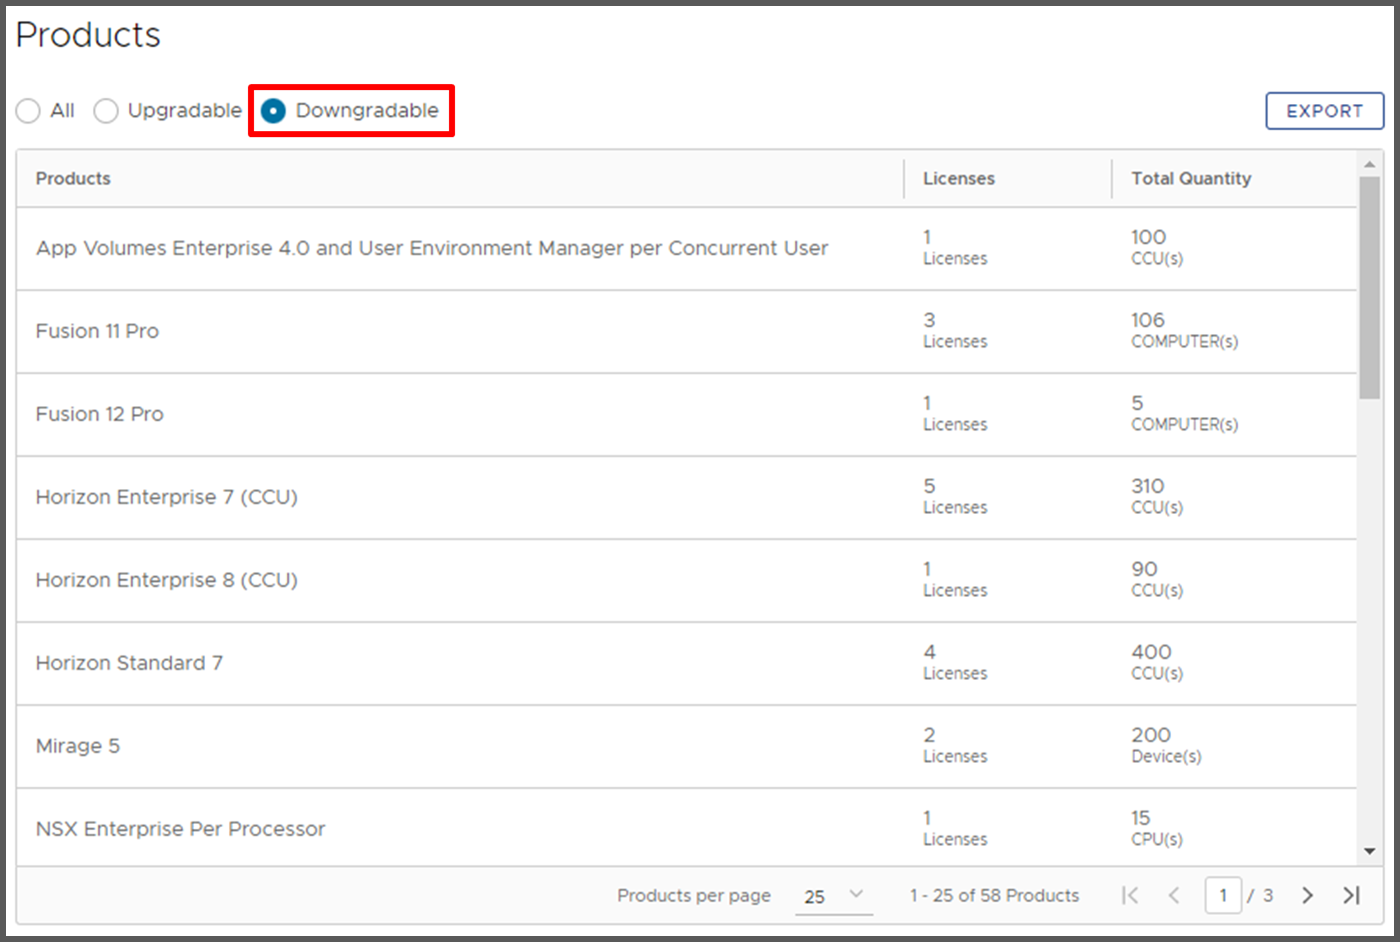](https://bs.etevers.tech/uploads/images/gallery/2022-12/HPGimage.png) 1\. 라이선스 관리 페이지에 이어 Show 항목에서 \[Downgradable\] 선택한 후 목록에서 라이선스 다운그레이드할 제품을 선택합니다. [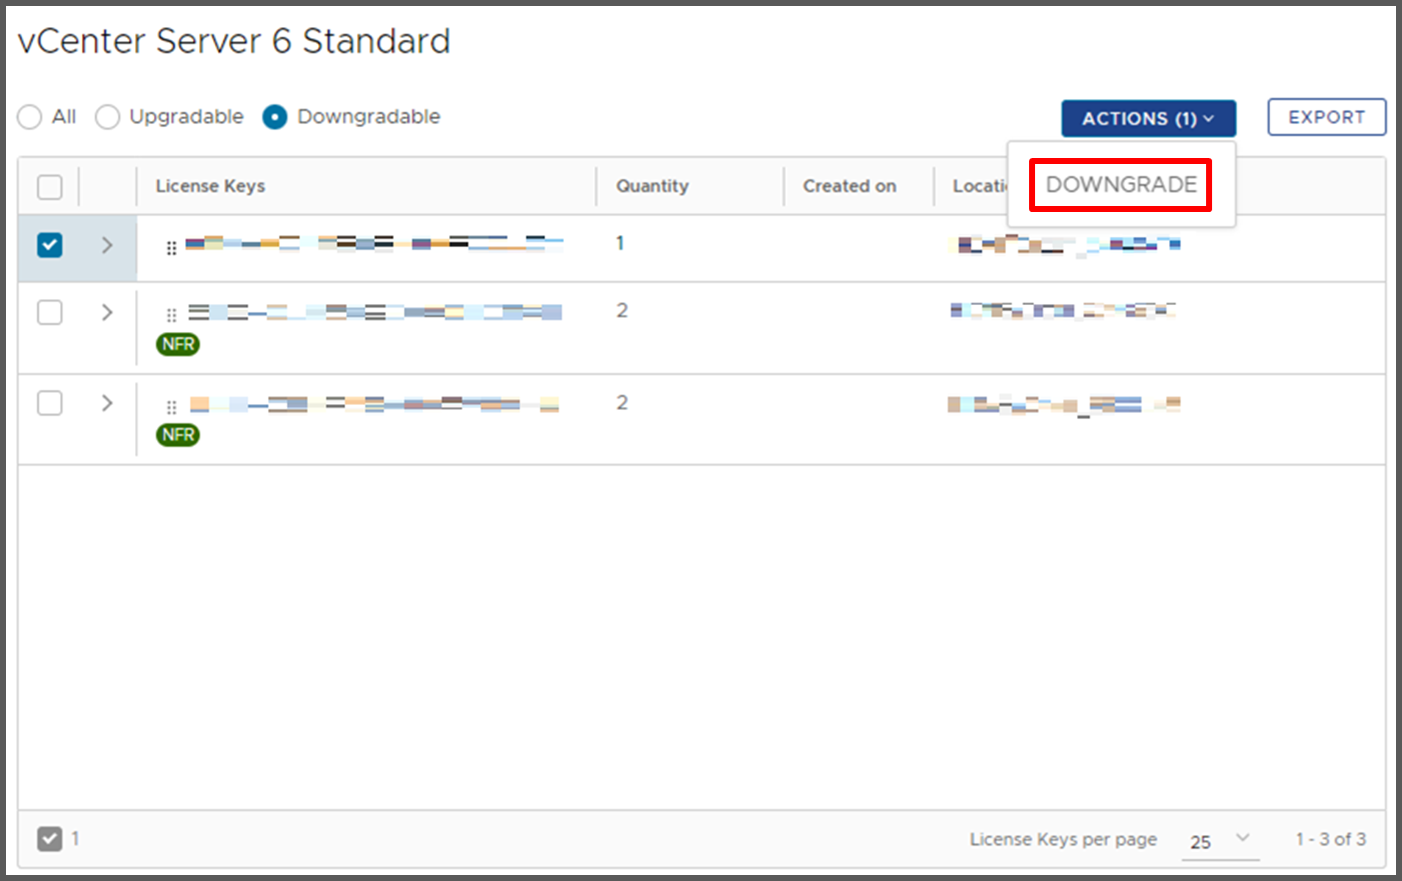](https://bs.etevers.tech/uploads/images/gallery/2022-12/9JXimage.png) 2\. 다운그레이드할 라이선스 키를 체크한 후 \[DOWNGRADE\]를 클릭합니다. [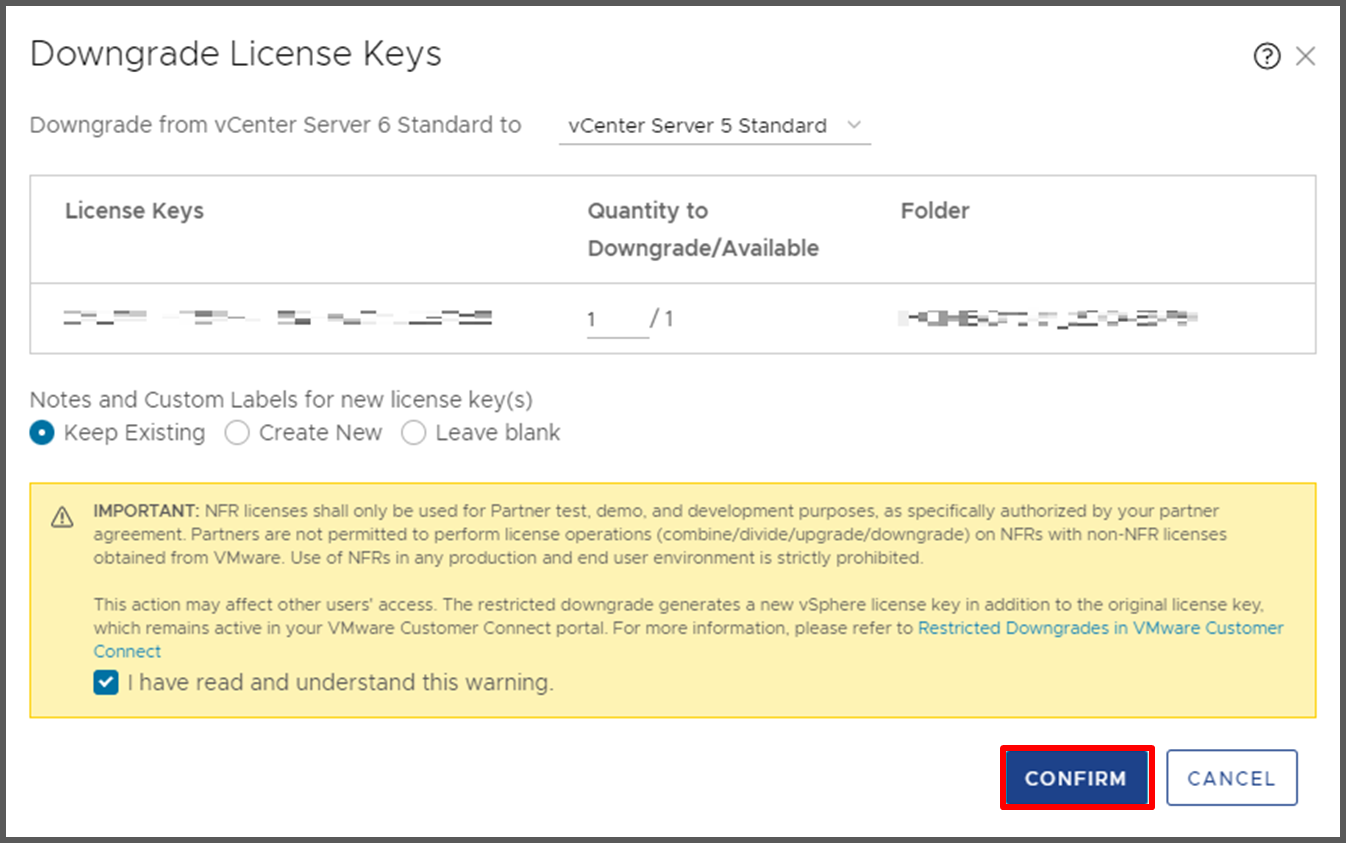](https://bs.etevers.tech/uploads/images/gallery/2022-12/1jTimage.png) 3\. 해당 창이 나타나면 원하는 수량과 필요 조건을 선택한 후 \[CONFIRM\]을 클릭하면 라이선스 다운그레이드가 완료됩니다. 아래의 경고를 읽고 이해했음을 체크하면 \[CONFIRM\]이 활성화됩니다. ### 결합 [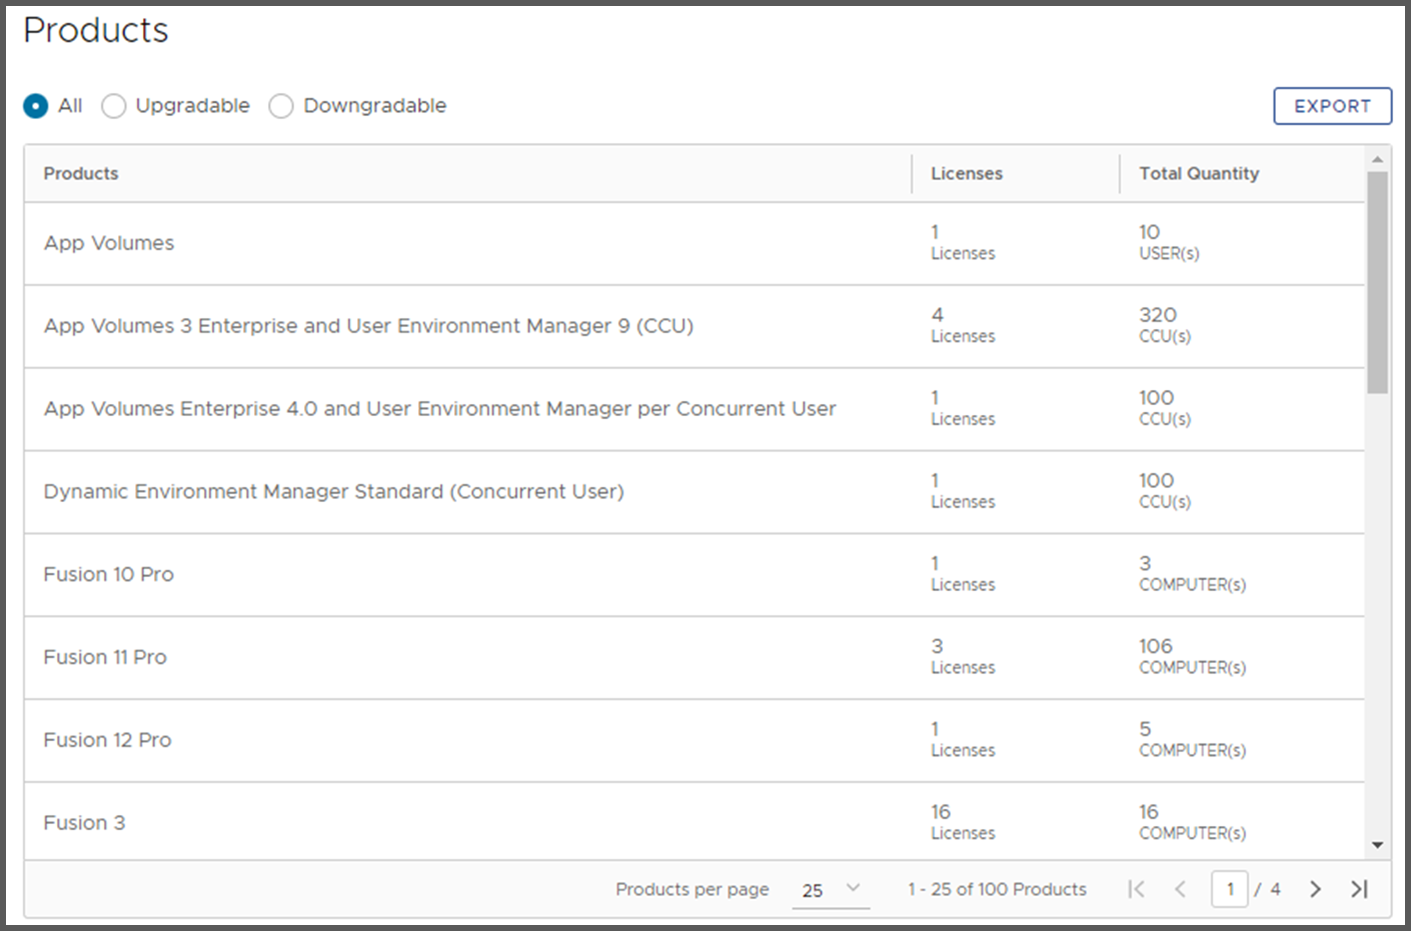](https://bs.etevers.tech/uploads/images/gallery/2022-12/Q5rimage.png)1. 라이선스 관리 페이지에 이어 Products 항목에서 라이선스 결합할 제품을 선택합니다. [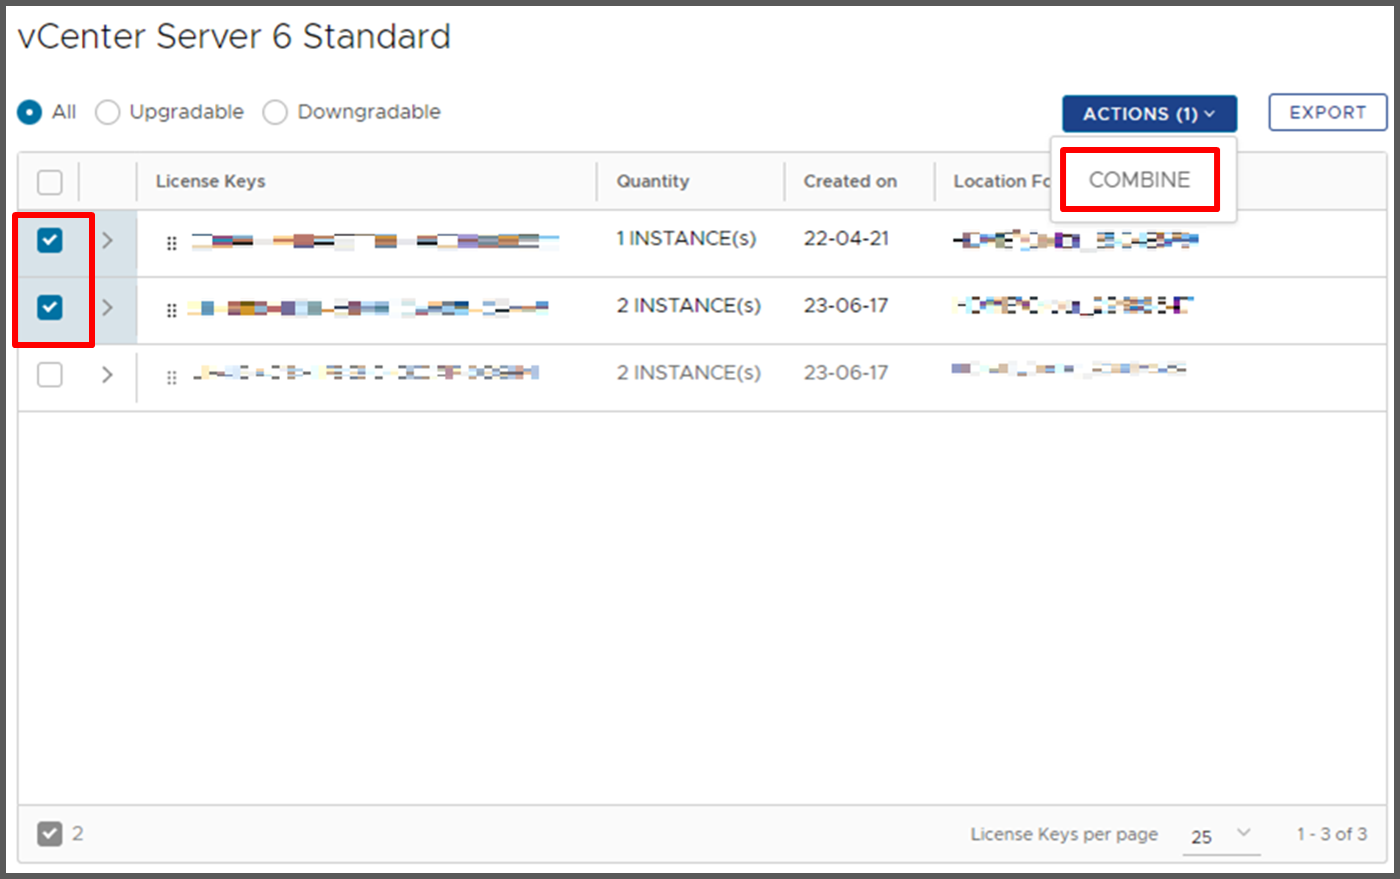](https://bs.etevers.tech/uploads/images/gallery/2022-12/bzMimage.png) 2\. 목록에서 결합할 라이선스 키를 선택한 후 \[COMBINE\]을 클릭합니다. [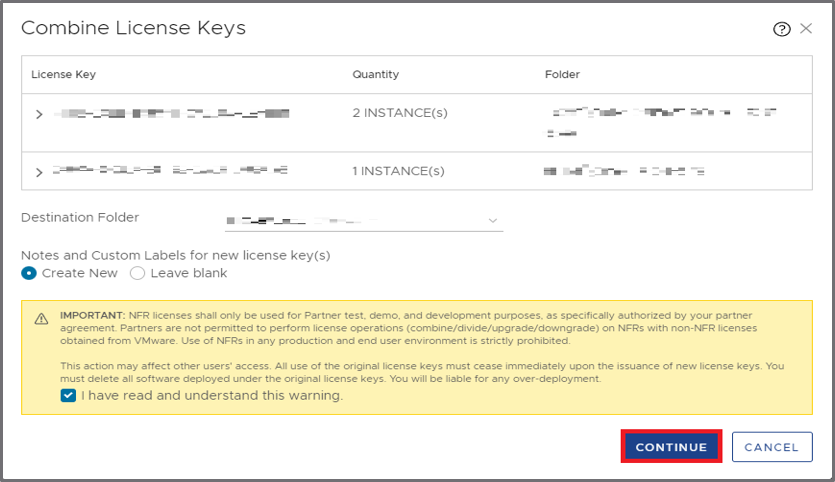](https://bs.etevers.tech/uploads/images/gallery/2022-06/YiE11.png) 3\. 해당 창이 나타나면 필요 조건을 선택한 후 \[CONTINUE\]를 클릭하면 라이선스 결합이 완료됩니다. 아래의 경고를 읽고 이해했음을 체크하면 \[CONTINUE\]가 활성화됩니다. ### 분할 [](https://bs.etevers.tech/uploads/images/gallery/2022-12/Q5rimage.png) 1\. 라이선스 관리 페이지에 이어 Products 항목에서 라이선스 분할할 제품을 선택합니다. [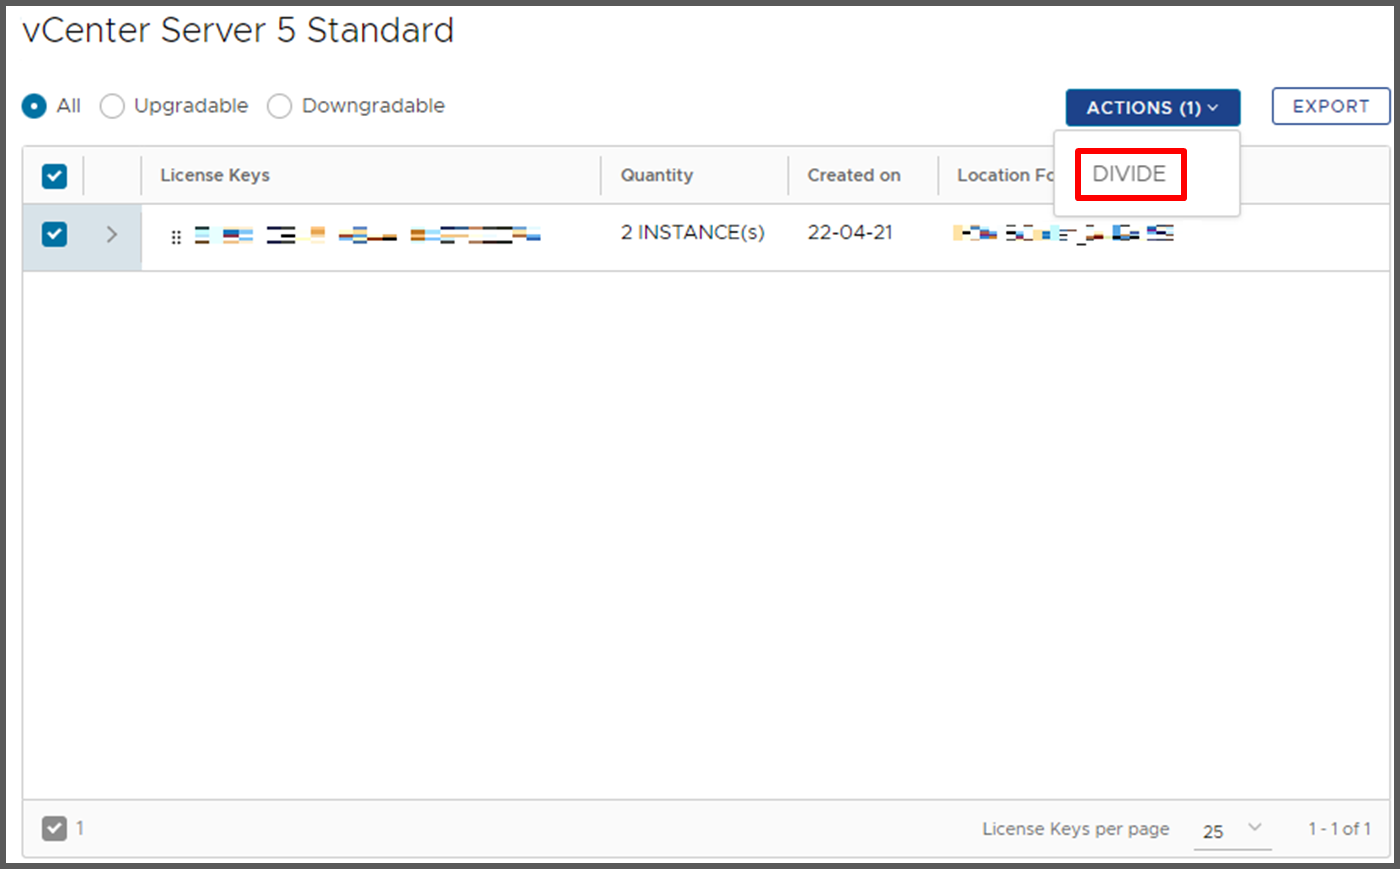](https://bs.etevers.tech/uploads/images/gallery/2022-12/15eimage.png) 2\. 목록에서 분할할 라이선스 키를 선택한 후 \[DIVIDE\]을 클릭합니다. [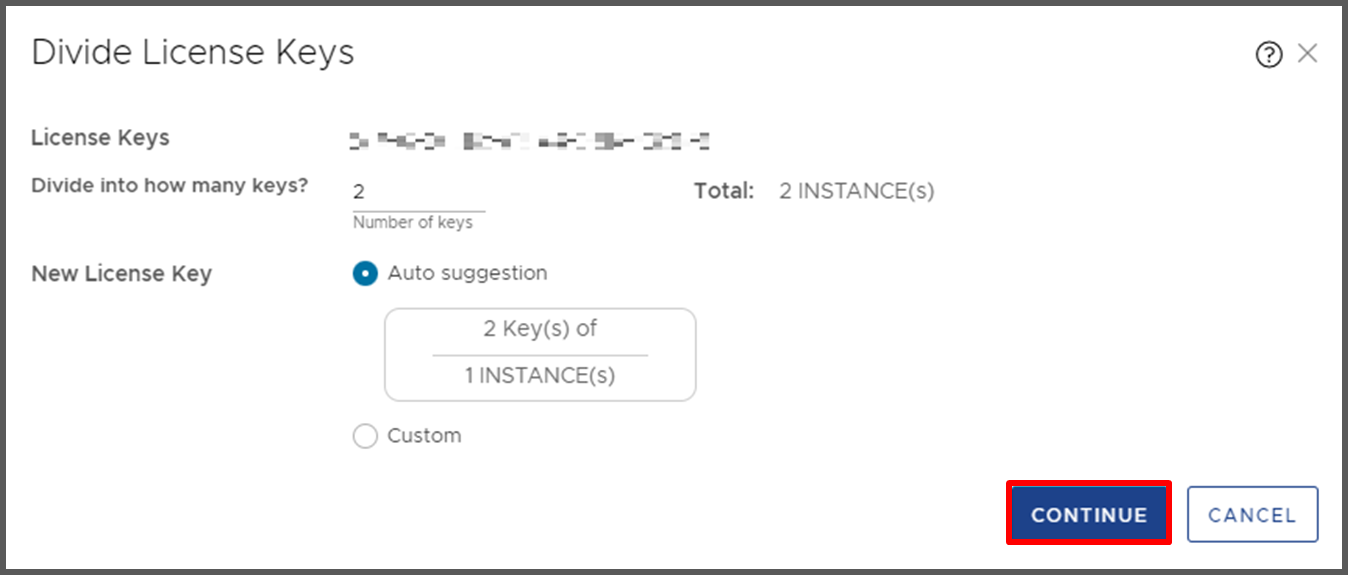](https://bs.etevers.tech/uploads/images/gallery/2022-12/87Zimage.png) 3\. 해당 창이 나타나면 새 라이선스 키의 수를 입력한 후 \[CONTINUE\]를 클릭하면 라이선스 분할이 완료됩니다. # Product Evaluation Center for VMware vSphere Hypervisor 라이선스 발급 가이드(배포중지) ## 해 **기존 VMware에서 제공해주던 vSphere Hypervisor 무료 라이선스는 배포 중지되었습니다. 관련된 내용 참고 부탁드립니다.** [https://blogs.vmware.com/cloud-foundation/2024/01/22/vmware-end-of-availability-of-perpetual-licensing-and-saas-services/](https://blogs.vmware.com/cloud-foundation/2024/01/22/vmware-end-of-availability-of-perpetual-licensing-and-saas-services/) ## 개요 본 문서는 Product Evaluation Center for VMware vSphere Hypervisor 라이선스를 발급받는 방법에 대하여 작성되었습니다. ## 발급 [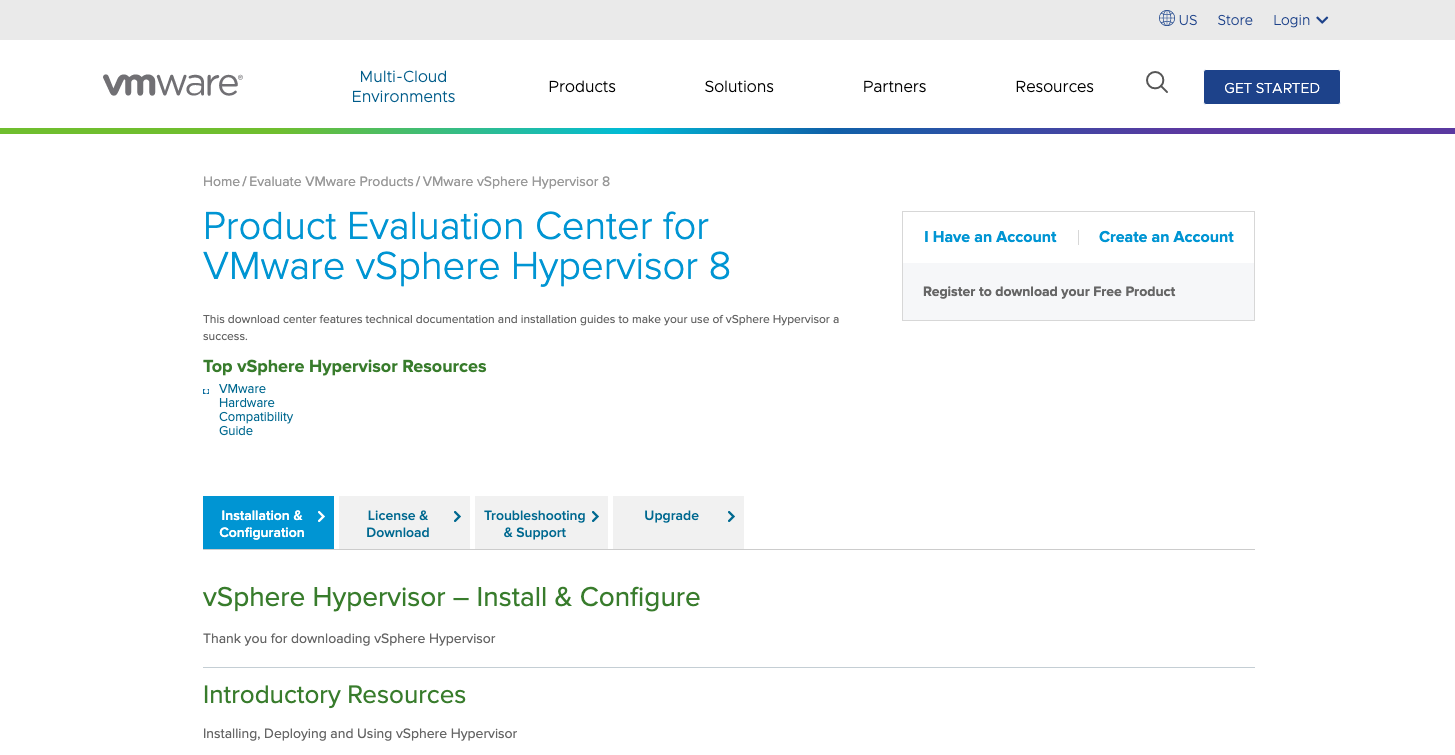](https://bs.etevers.tech/uploads/images/gallery/2023-03/iI5image.png) 1. 구글에 Download VMware vSphere Hypervisor for Free 를 검색 후 링크를 클릭하여 접속합니다. [https://customerconnect.vmware.com/en/evalcenter?p=free-esxi8](https://customerconnect.vmware.com/en/evalcenter?p=free-esxi8)vSphere Hypervisor 버전은 최신버전인 8버전 기준으로 라이선스가 발급됩니다. 7버전 라이선스를 발급받기 위해선 해당 링크의 숫자를 변경해주세요. 가이드는 8버전 기준으로 가이드 진행합니다. 예) [https://customerconnect.vmware.com/en/evalcenter?p=free-esxi8 (ESXi8)](https://customerconnect.vmware.com/en/evalcenter?p=free-esxi8) 예) [https://customerconnect.vmware.com/en/evalcenter?p=free-esxi7 (ESXi7)](https://customerconnect.vmware.com/en/evalcenter?p=free-esxi7)
[](https://bs.etevers.tech/uploads/images/gallery/2023-03/G8Mimage.png) 2\. I Have an Account를 클릭하여 로그인합니다. 계정이 없다면 Create an Account를 클릭하여 계정을 생성합니다.(Customer Connect 계정) [](https://bs.etevers.tech/uploads/images/gallery/2023-03/VHGimage.png) 2\. 로그인 후 \[Register\] 를 클릭합니다. [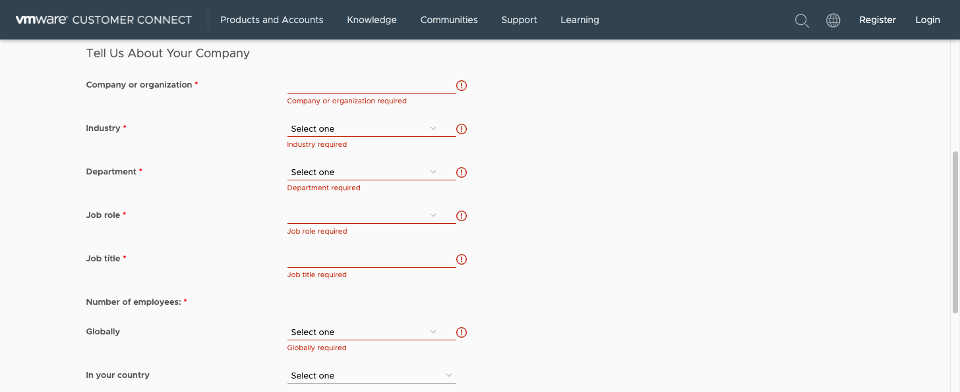](https://bs.etevers.tech/uploads/images/gallery/2023-03/qCZimage.png) 3\. 해당 창이 나타나면 \* 표시가 있는 부분을 기입한 후 아래 \[START FREE TRIAL\]을 클릭합니다. [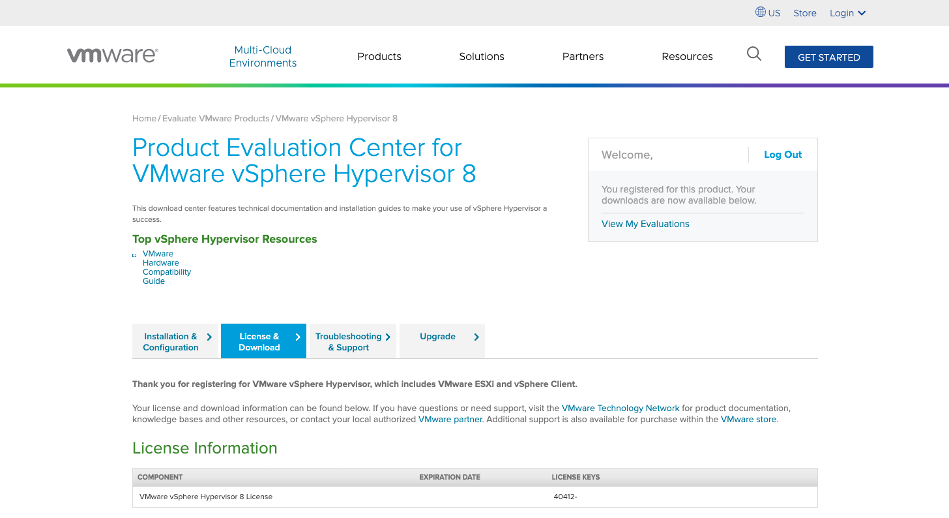](https://bs.etevers.tech/uploads/images/gallery/2023-03/ZIFimage.png) 4\. 로딩이 완료되면 License Information 에 라이선스 키와 ISO파일을 다운로드하기위한 링크가 제공됩니다. [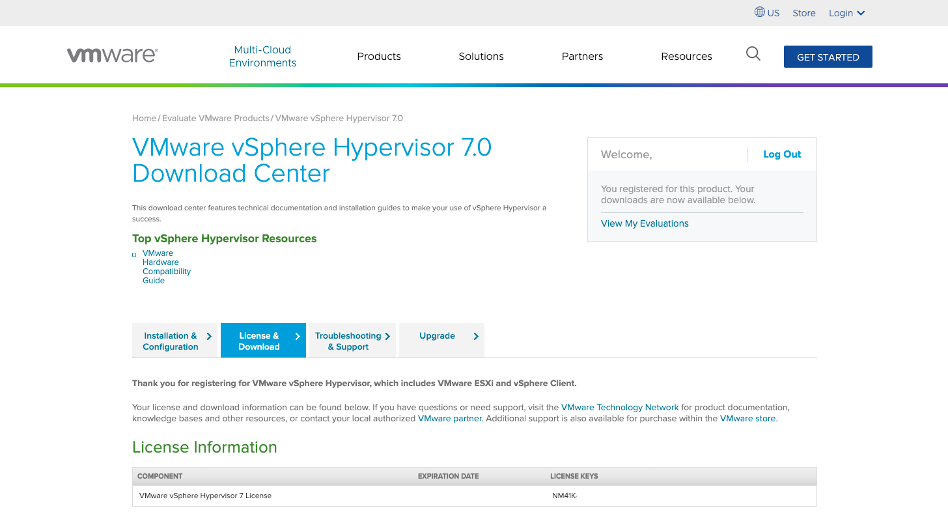](https://bs.etevers.tech/uploads/images/gallery/2023-03/UlGimage.png) 5\. vSphere Hypervisor 7버전도 동일하게 라이선스 발급이 가능합니다. ## 맺음말 [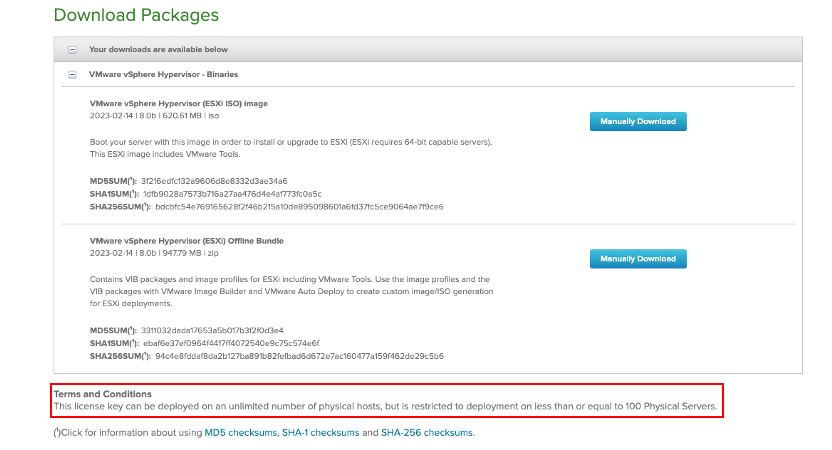](https://bs.etevers.tech/uploads/images/gallery/2023-03/6Mximage.png) VMware ESXi 하이퍼바이저 무료 라이선스 키 당 100개까지 사용이 허가됨을 확인할 수 있다. # VMware Hands on Lab 계정 생성 가이드 ## 개요 본 문서는 VMware Hands on Lab(HoL) 서비스 사용을 위해 계정 생성 및 HoL 시작 방법에 대하여 작성되었습니다.본 가이드 문서는 **Customer Connect** 계정을 통한 HoL 등록 가이드 입니다.
## 계정 생성 [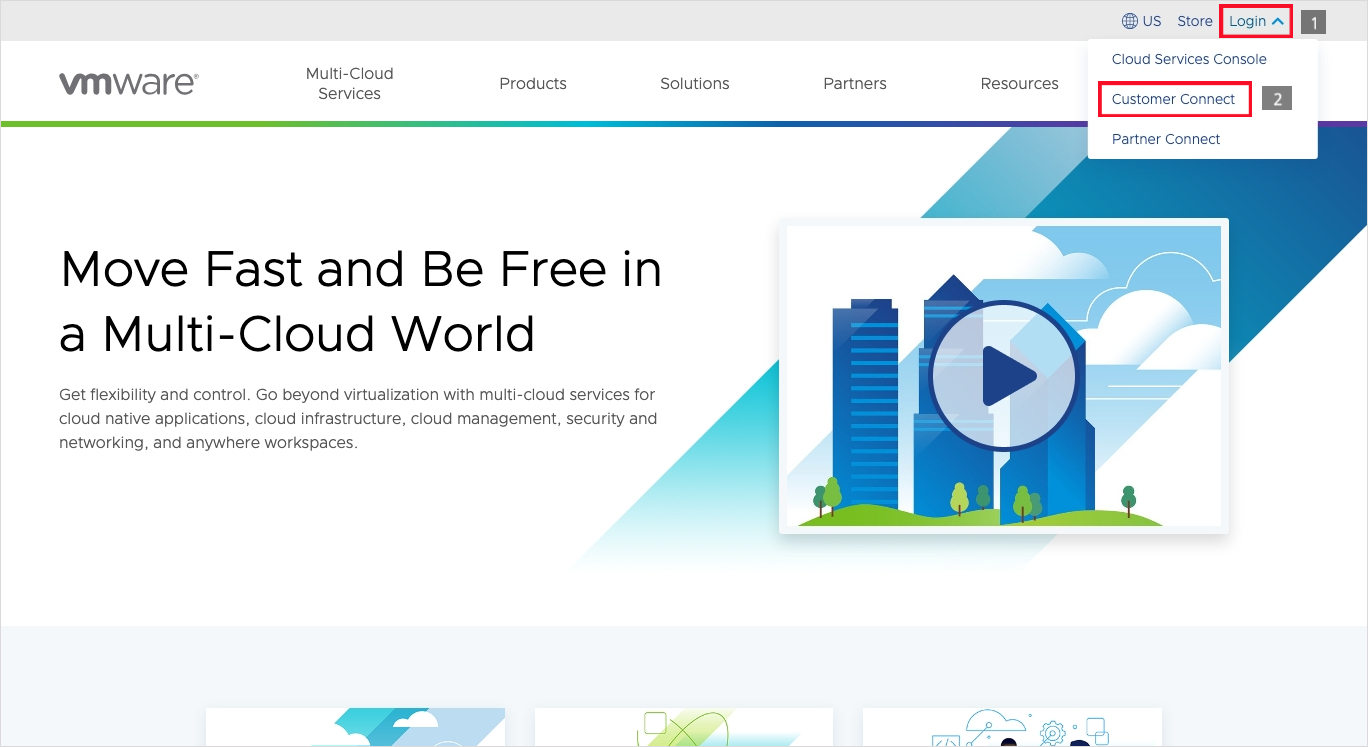](https://bs.etevers.tech/uploads/images/gallery/2023-09/7SQimage.png) 1. 구글에 VMware 를 검색 후 홈페이지 링크 클릭하여 접속합니다. [https://www.vmware.com/](https://www.vmware.com/) [](https://bs.etevers.tech/uploads/images/gallery/2023-09/7SQimage.png) 2\. \[Login\] -> \[Customer Connect\]를 클릭하여 Customer Connect 사이트로 이동합니다. [](https://bs.etevers.tech/uploads/images/gallery/2023-09/8Acimage.png) 3\. 계정 생성을 위해 \[Sign up now\] 를 클릭합니다. [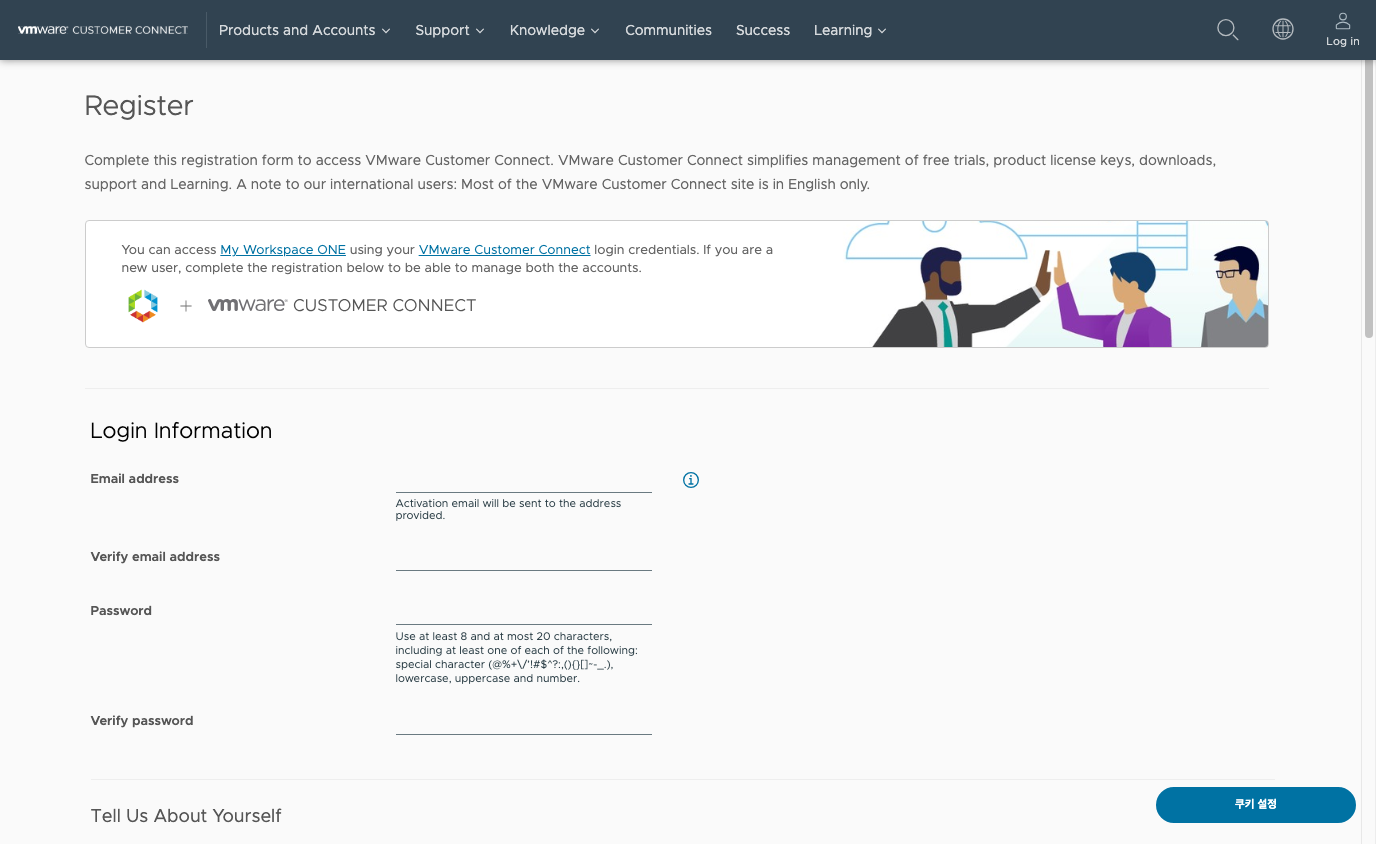](https://bs.etevers.tech/uploads/images/gallery/2023-09/94iimage.png) 4\. 해당 창이 나타나면 빈칸에 내용을 기입한 후 아래 \[REGISTER\]을 클릭하여 계정을 생성합니다. [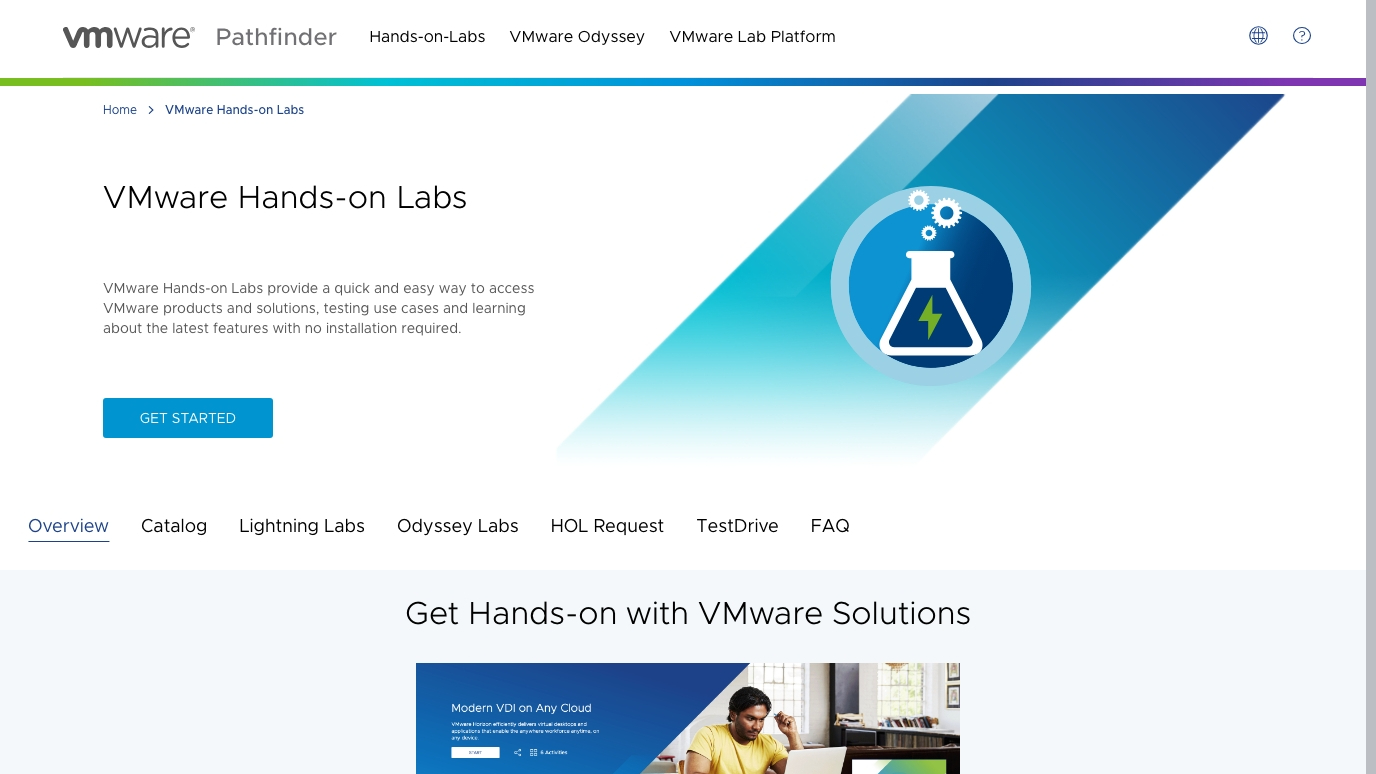](https://bs.etevers.tech/uploads/images/gallery/2023-09/R9simage.png) 5\. 계정 생성이 완료되면 구글에서 VMware Hands on Lab을 검색 후 홈페이지 링크를 클릭합니다. [https://hol.vmware.com/](https://hol.vmware.com/) [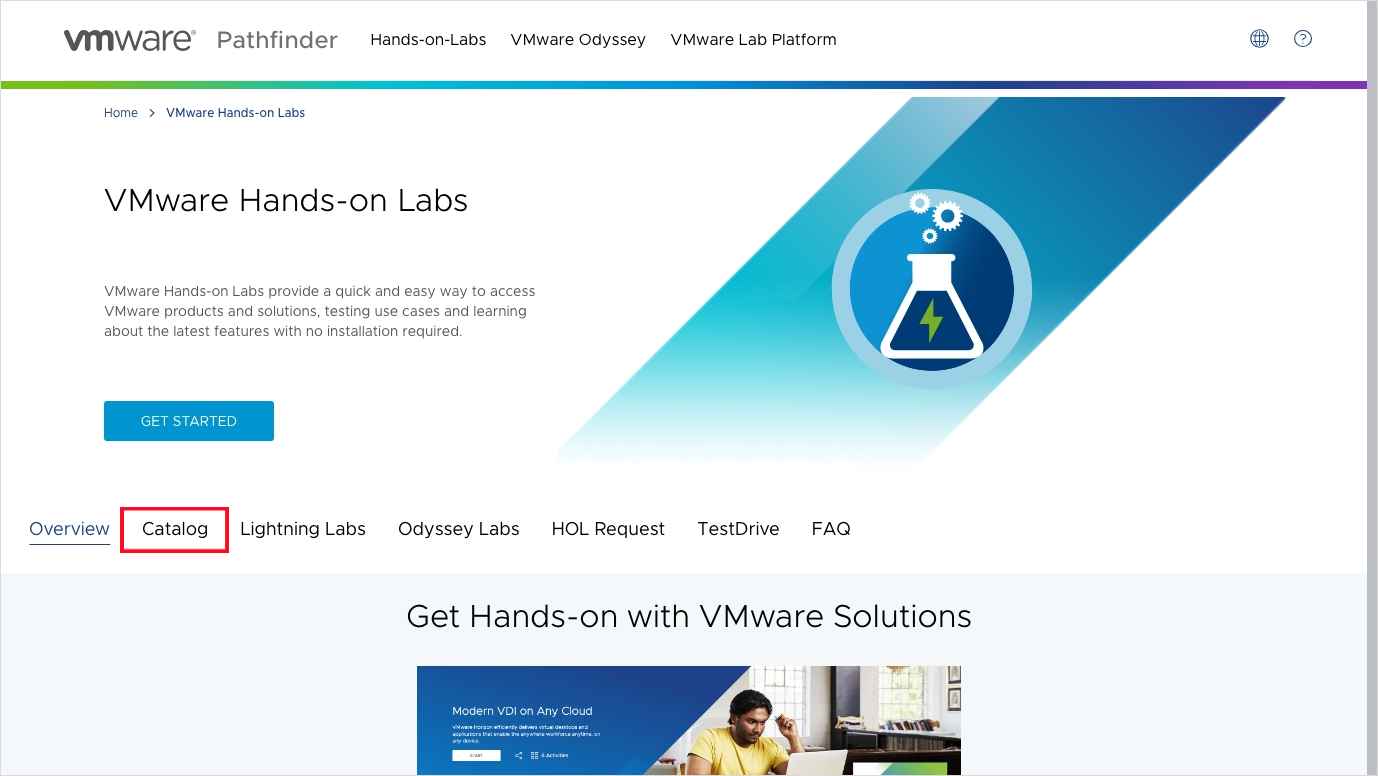](https://bs.etevers.tech/uploads/images/gallery/2023-09/oclimage.png) 6\. \[Catalog\] 를 클릭합니다. [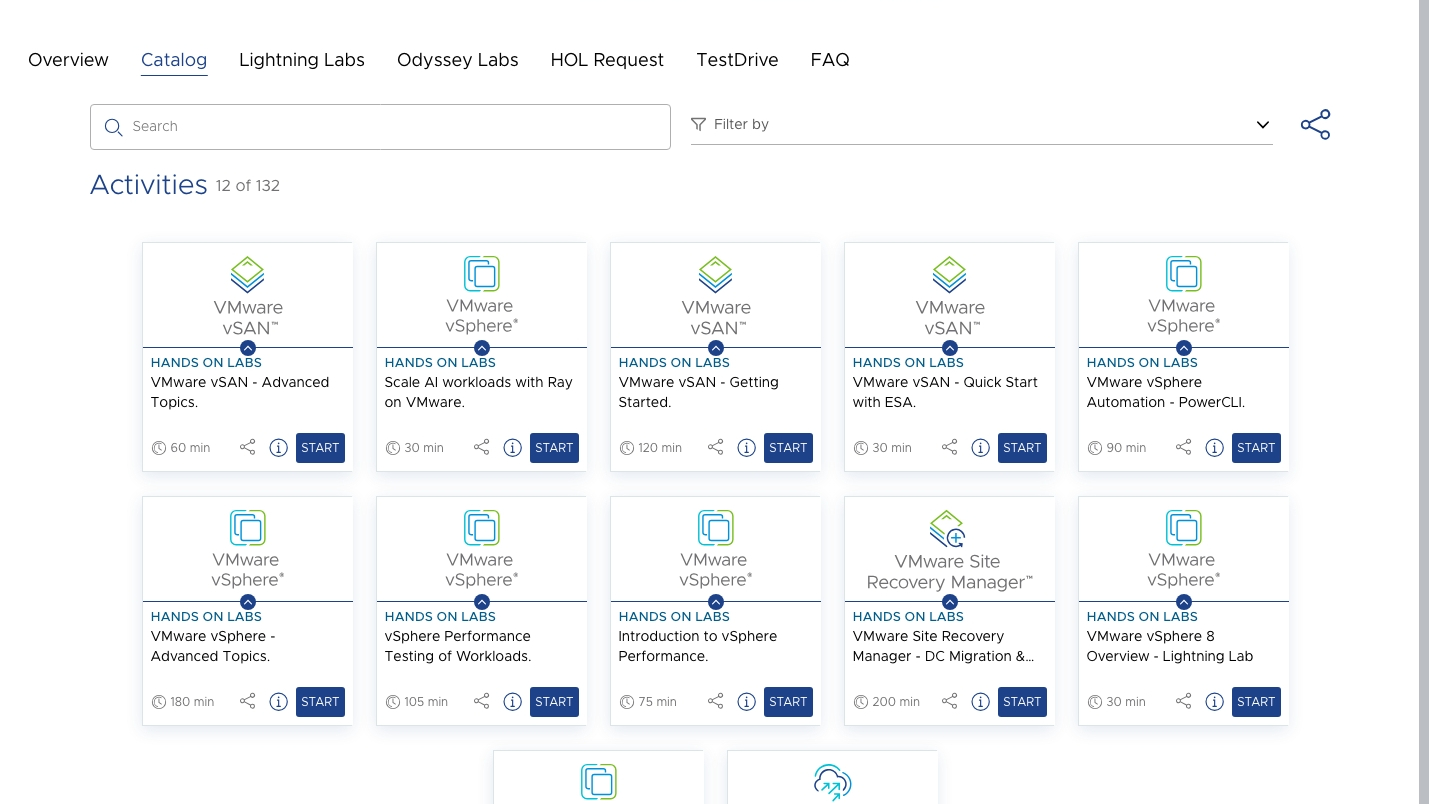](https://bs.etevers.tech/uploads/images/gallery/2023-09/7T1image.png) 7\. 진행하고싶은 HoL을 선택하여 \[Start\] 를 클릭합니다. [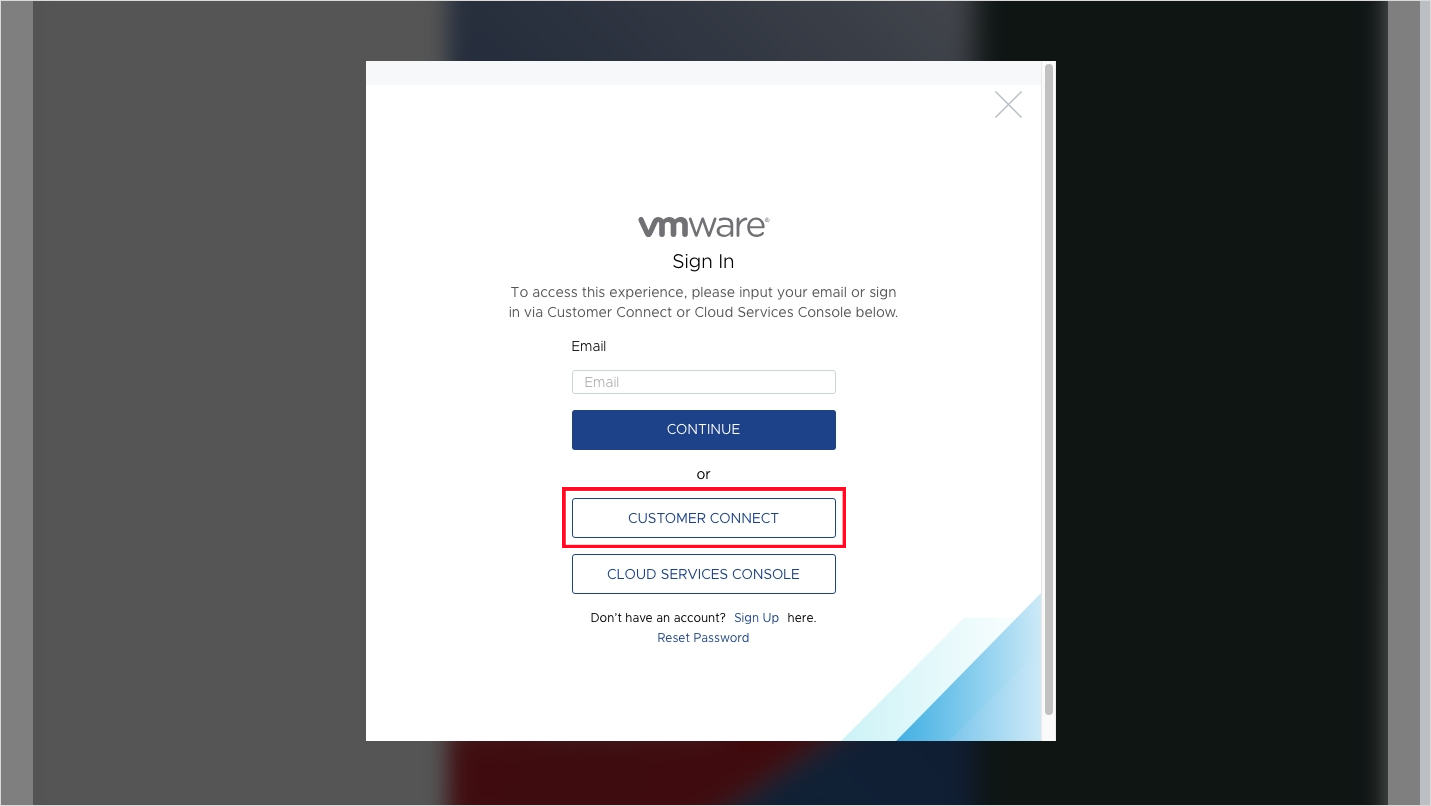](https://bs.etevers.tech/uploads/images/gallery/2023-09/khFimage.png) 8.\[Customer Connect\]를 선택하여 로그인합니다. [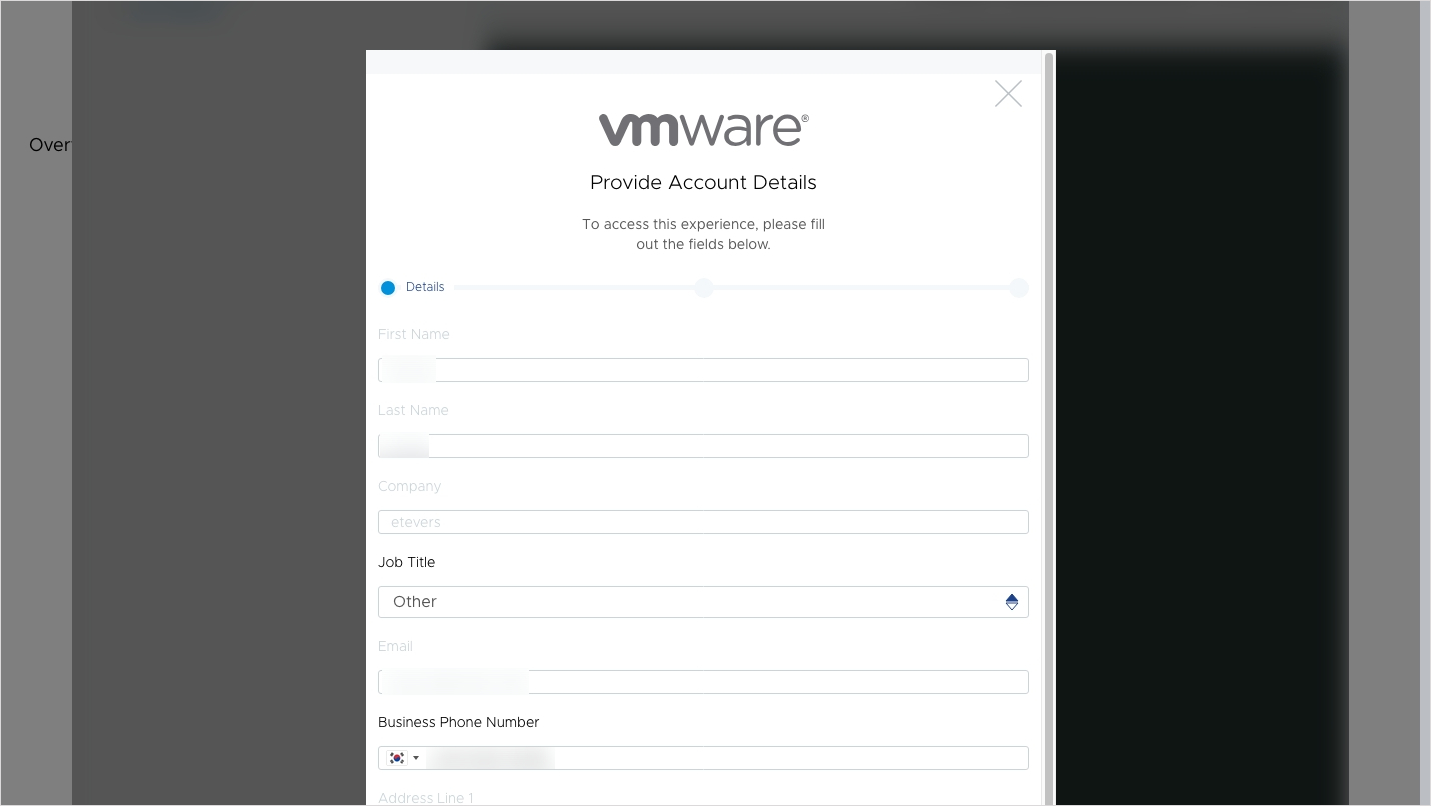](https://bs.etevers.tech/uploads/images/gallery/2023-09/sPUimage.png) 9\. 위의 화면처럼 Customer Connect 계정에 기입한 내용을 확인할 수 있습니다. 아래로 스크롤하여 \[Create Account\]를 클릭합니다. [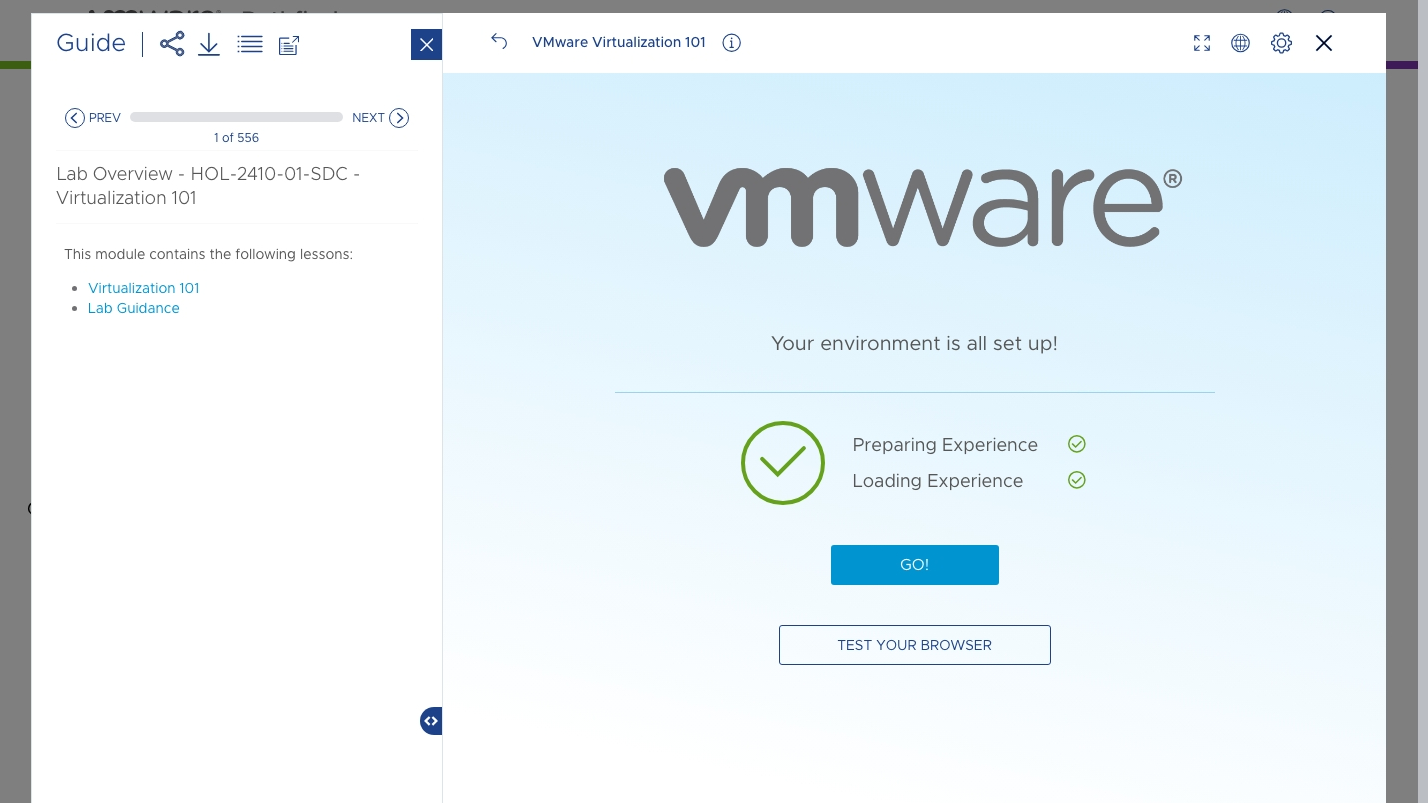](https://bs.etevers.tech/uploads/images/gallery/2023-09/xG9image.png) 10\. \[GO\] 를 클릭하여 HoL을 진행할 수 있습니다. [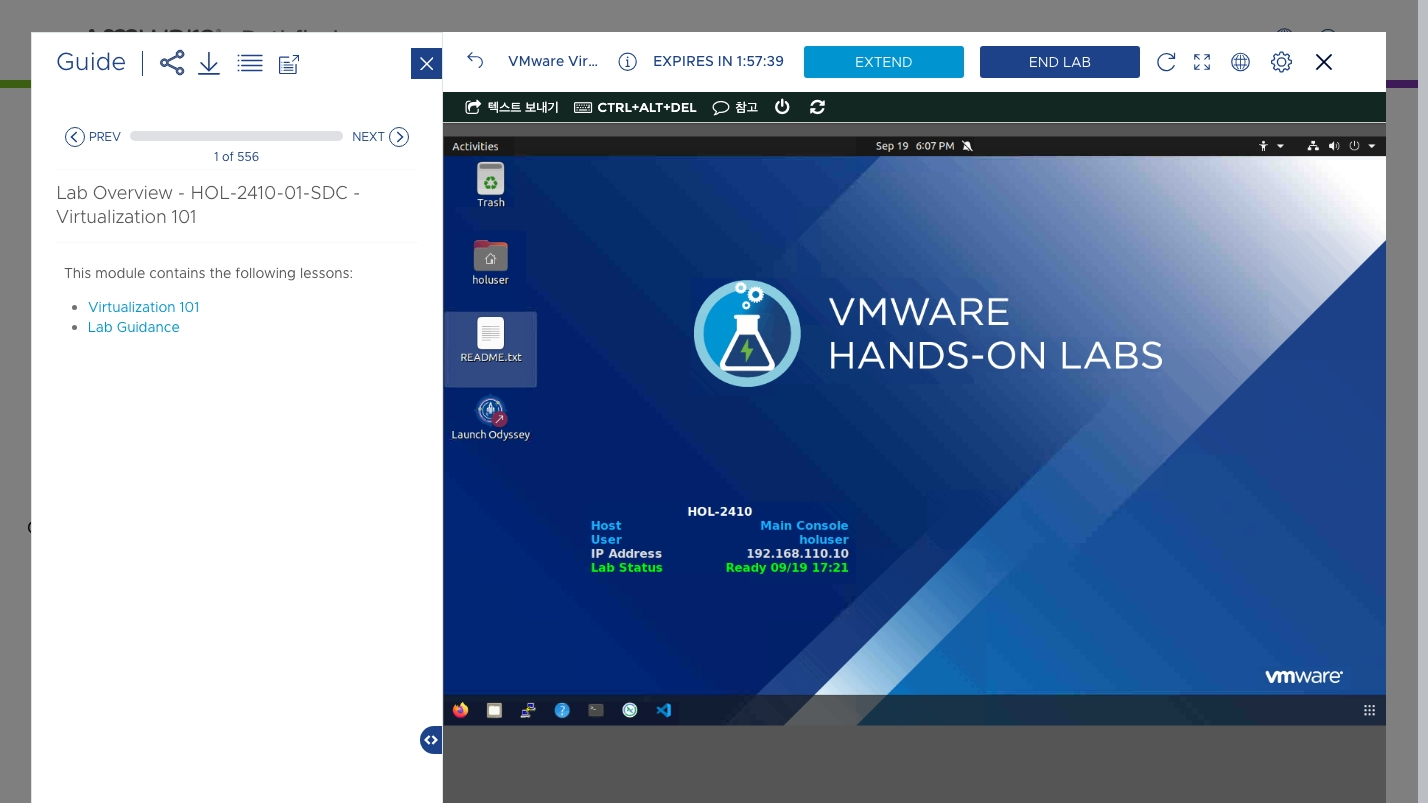](https://bs.etevers.tech/uploads/images/gallery/2023-09/CAYimage.png) 11\. HoL을 진행하는 이미지입니다. ## 맺음말 VMware에서 제공하는 Hands on Lab은 필요 시 생성이 가능하며, 만료가 되더라도 다시 등록하여 사용이 가능합니다.